
Imagine sinking your teeth into a tiny cloud of crimson delight, where the tangy zip of cheesecake meets the subtle cocoa notes of red velvet. These Red Velvet Cheesecake Bites are a symphony of flavor and texture in miniature form, perfect for any occasion.
Each bite delivers a creamy, dreamy experience, so addictive you might find yourself sneaking back to the kitchen for “just one more.” Consider these little wonders the edible equivalent of a romantic comedy: charming, delightful, and guaranteed to leave you smiling.
- Effortless elegance: Impress your guests with a sophisticated dessert that’s surprisingly easy to make.
- Perfectly balanced flavors: The creamy cheesecake filling complements the light cocoa flavor of the red velvet, creating a harmonious taste.
- Eye-catching presentation: The vibrant red color and bite-sized form make these treats visually stunning.
- Versatile indulgence: Enjoy them as a party snack, a sweet ending to a meal, or a delightful anytime treat.
Ingredients for Red Velvet Cheesecake Bites
Here’s what you’ll need to make this delicious dish:
The full ingredients list, including measurements, is provided in the recipe card directly below.
How to Make Red Velvet Cheesecake Bites
Follow these simple steps to prepare this delicious dish:
Step 1: Prep Time, Preheat the Oven, and Get Ready
Preheat your oven to 350°F (175°C). Line a muffin tin with paper liners. This prevents sticking and makes for easy removal of your Red Velvet Cheesecake Bites.
Step 2: Mix the Dry Elements for the Red Velvet Base
In a medium bowl, whisk together the flour, sugar, cocoa powder, baking soda, and salt. Dry ingredients evenly distributed are the key to a perfect mix.
Step 3: Combine the Wet Elements to complete the Red Velvet Batter
In a separate bowl, mix together the buttermilk, vegetable oil, red food coloring, and Alcohol-free alcohol-free vanilla extract. Add the wet ingredients to the dry ingredients and mix until just combined. Be careful not to overmix!
Step 4: Prepare the Cream Cheese Filling
In another bowl, beat the softened cream cheese until smooth and creamy. Add the sugar and continue to beat until well combined. Mix in the egg and sour cream until just combined. Again, avoid overmixing.
Step 5: Assemble the Red Velvet Cheesecake Bites
Fill each muffin liner about 1/3 full with the red velvet batter. Top with a spoonful of the cream cheese filling.
Step 6: Bake and Cool
Bake for 18-20 minutes, or until a toothpick inserted into the center comes out clean. Let the Red Velvet Cheesecake Bites cool completely in the muffin tin before frosting (optional).
Transfer to a serving platter and dust with cocoa powder, powdered sugar, or top with a cream cheese frosting for the perfect finishing touch. These are best served chilled.
Perfecting the Cooking Process

To achieve baking nirvana, start by prepping all your ingredients. Cream the butter and sugar until light and fluffy before adding eggs one at a time. Gently fold in the dry ingredients to avoid overmixing, which leads to tough bites. Bake until just set for a creamy, dreamy texture.
Add Your Touch
Unleash your inner artist! Swap the cream cheese filling for a tangy lemon curd. Or, sprinkle chocolate chips into the red velvet batter for an extra layer of decadence. Get creative with the toppings – crushed cookies or a dusting of cocoa powder could also work.
Storing & Reheating
Keep your precious Red Velvet Cheesecake Bites in an airtight container in the refrigerator for up to five days. They taste amazing chilled! If you want to warm them slightly, a few seconds in the microwave will do the trick, but be careful not to melt the cheesecake filling.
- Use room temperature ingredients for a smoother, more uniform batter that bakes evenly.
- Avoid over-baking the bites; they should be slightly soft in the center when you pull them out.
- For an extra moist texture, brush the tops of the bites with a simple syrup immediately after baking.
(Personal anecdote formated as paragraph subheading)
I remember the first time I made these, my nephew devoured half the batch in one sitting! He declared them the “best thing ever,” which is high praise from a picky ten-year-old.
Conclusion for Red Velvet Cheesecake Bites:
These Red Velvet Cheesecake Bites are the perfect treat when you’re craving something decadent and impressive, but don’t want to spend hours in the kitchen. They’re easy to make, incredibly delicious, and guaranteed to impress. The combination of the vibrant red velvet flavor, creamy cheesecake filling, and rich chocolate cookie crust creates a symphony of textures and tastes that is simply irresistible. So go ahead, whip up a batch, and prepare to be amazed at how quickly these bite-sized delights disappear!
Print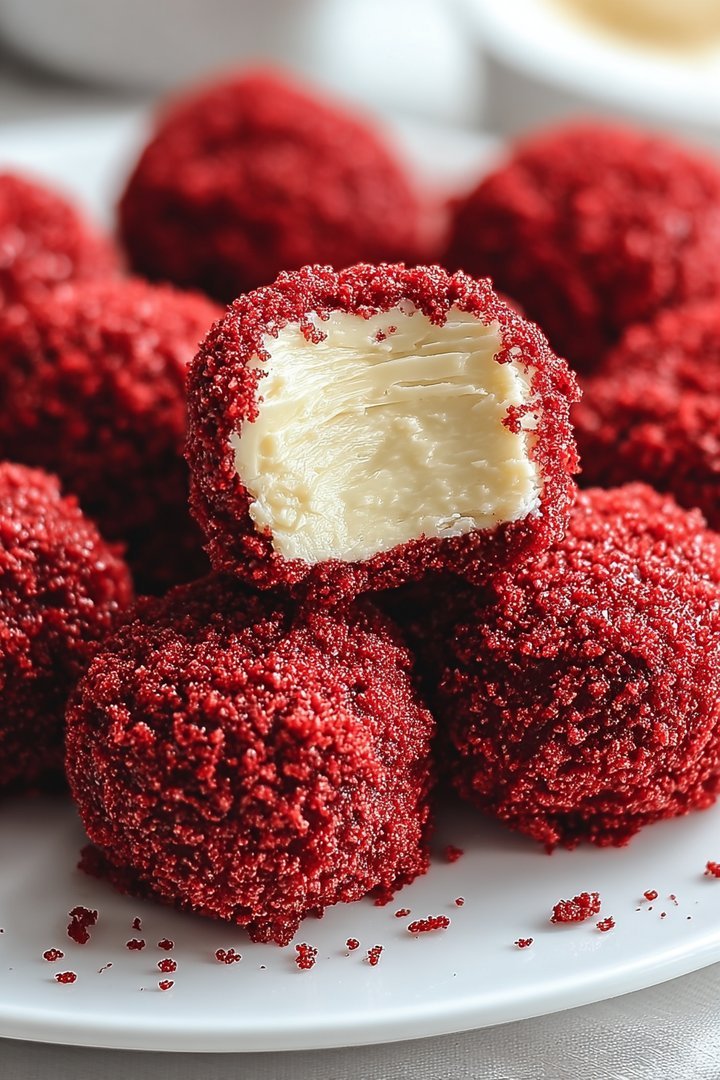
Red Velvet Cheesecake Bites
Delicious red velvet cheesecake bites recipe with detailed instructions and nutritional information.
- Total Time: 35 minutes
- Yield: 4 servings
Ingredients
- All-purpose flour: 1 cup
- Granulated sugar: 1 cup
- Unsweetened cocoa powder: 2 tablespoons
- Baking soda: 1 teaspoon
- Buttermilk: 1 cup
- Vegetable oil: 1/2 cup
- Red food coloring: 1 tablespoon
- Cream cheese, softened: 8 ounces
Instructions
- Step 1: Preheat oven to 350°F (175°C). Line a mini muffin tin with paper liners.
- Step 2: In a large bowl, whisk together flour, sugar, cocoa powder, and baking soda.
- Step 3: In a separate bowl, combine buttermilk, oil, and red food coloring. Add wet ingredients to dry ingredients and mix until just combined.
- Step 4: Fill each muffin liner about 2/3 full with red velvet batter.
- Step 5: Bake for 12-15 minutes, or until a toothpick inserted into the center comes out clean. Let cool completely before frosting with softened cream cheese.
Notes
- For optimal flavor and texture, store these cheesecake bites in an airtight container in the refrigerator.
- Reheating isn't recommended; these bites are best enjoyed chilled or at room temperature.
- Garnish with a sprinkle of cocoa powder or mini chocolate chips for a delightful presentation.
- Don't overmix the batter—a few streaks are okay! Overmixing develops gluten, making them less tender.
- Prep Time: 15 minutes
- Cook Time: 20 minutes
- Method: Stovetop
- Cuisine: American
FAQs:
Can I make these Red Velvet Cheesecake Bites ahead of time?
Absolutely! In fact, making these little beauties ahead of time is highly recommended. They need time to chill and set properly, allowing the flavors to meld into a symphony of deliciousness. Prepare them a day or two in advance and store them covered in the refrigerator. Just be warned, the hardest part will be resisting the urge to sneak one (or three) before your guests arrive! This preparation will save you time and stress when you are ready to present your delightful red velvet cheesecake bites.
What’s the best way to prevent the cheesecake from cracking?
Ah, the dreaded cheesecake crack! To avoid this culinary catastrophe, try a few tricks. First, don’t overbake the cheesecakes. Second, let them cool gradually in the oven with the door slightly ajar. This slow cooling process helps prevent rapid temperature changes that can lead to cracks. Finally, adding a tablespoon of cornstarch to the cheesecake batter can also help stabilize it. Remember, even if they do crack a little, a dusting of cocoa powder can hide a multitude of sins!
How do I store leftover Red Velvet Cheesecake Bites?
If you happen to have any leftover red velvet cheesecake bites (a rare occurrence, I assure you!), store them in an airtight container in the refrigerator. They will keep well for up to 3-4 days. Although, from personal experience, they tend to disappear much faster than that. Just a friendly warning: be prepared for your family or roommates to launch a covert operation to steal them from the fridge. These delectable treats are simply irresistible!
Can I use a different kind of cookie for the crust of these Cheesecake Bites?
Yes, you can definitely experiment with different cookie crusts! While chocolate cookies provide a beautiful contrast with the red velvet, you could also use vanilla wafers, graham crackers, or even shortbread cookies. The choice is yours! Just make sure to adjust the amount of melted butter accordingly to achieve the right consistency for a crumbly, yet firm crust. Get creative and see what flavor combinations tickle your taste buds. After all, baking should be fun!


Leave a Comment