
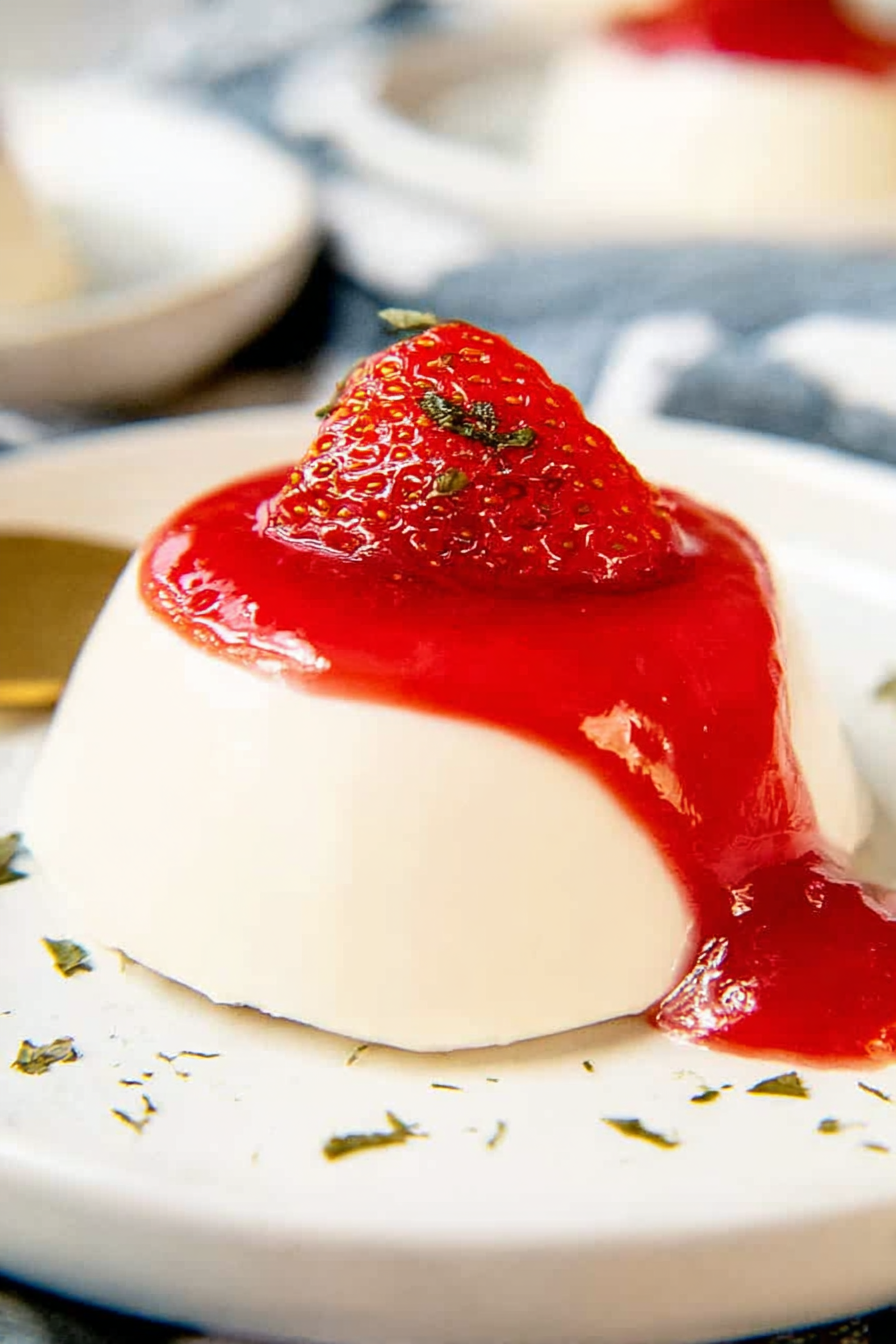
Have you ever craved a dessert so smooth, so creamy, it practically melts on your tongue? A Classic Panna Cotta Recipe is just that. Prepare yourself for a culinary adventure! This isn’t your grandma’s gelatinous jiggle; this is a refined, elegant experience.
Imagine the subtle sweetness dancing on your palate, the velvety texture coating your mouth like a luxurious hug. A Classic Panna Cotta Recipe, perfectly chilled, is the epitome of sophisticated simplicity.
This Classic Panna Cotta Recipe boasts several winning qualities.
It’s incredibly easy to prepare, even for novice cooks.
The flavor profile is delicately sweet and creamy, perfect for any occasion.
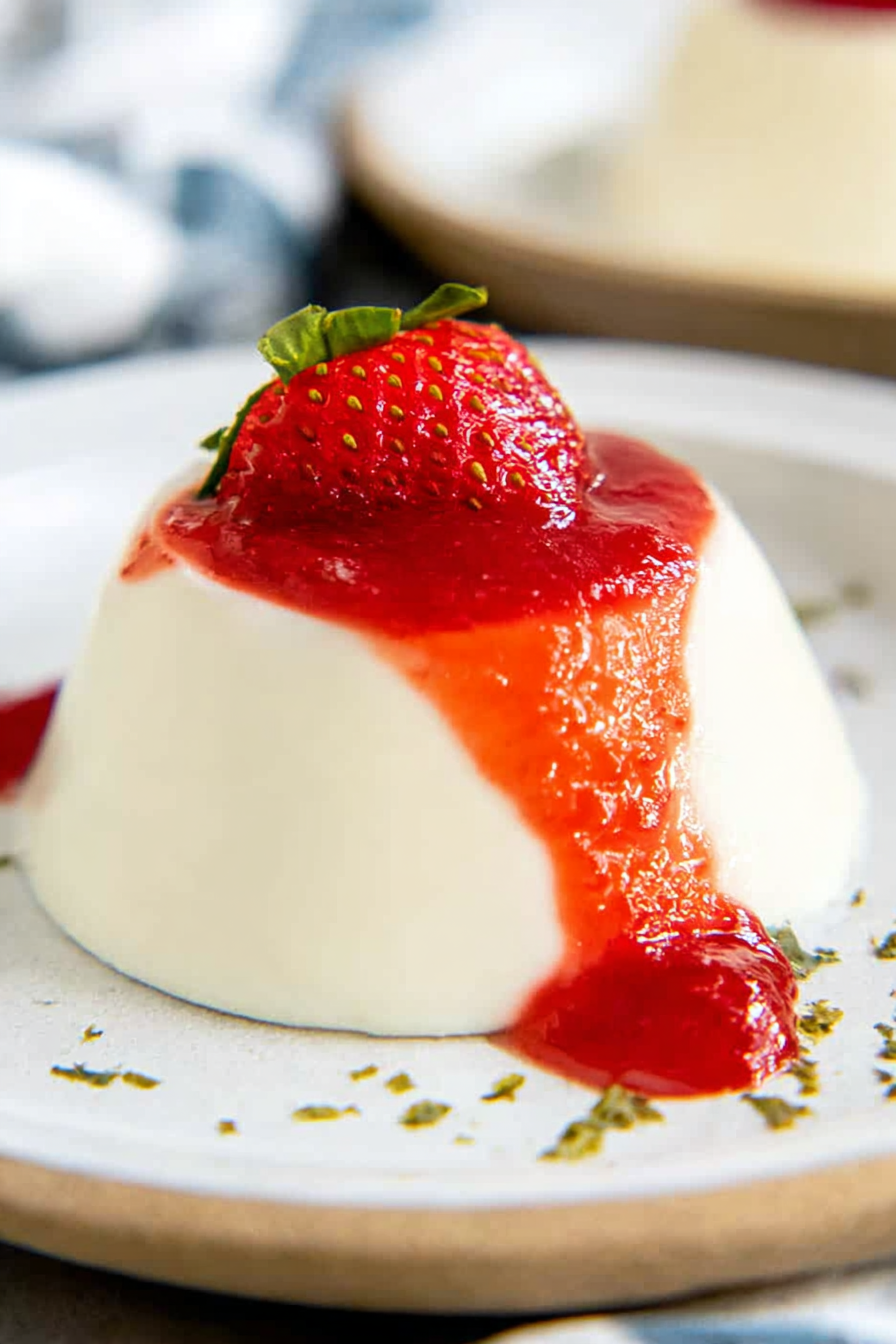
Its visually stunning appearance makes it perfect for entertaining guests.
Its versatility allows for endless creative variations with fruits, sauces, and toppings.
Ingredients for Classic Panna Cotta Recipe
Here’s what you’ll need to make this delicious dish:
The full ingredients list, including measurements, is provided in the recipe card directly below.
How to Make Classic Panna Cotta Recipe
Follow these simple steps to prepare this delicious dish:
Step 1: Preparing the Agar-Agar
In a small saucepan, combine the agar-agar powder with a quarter cup of cold water. Let it sit for a few minutes to allow the powder to fully hydrate. This prevents clumping later.
Step 2: Combining the Ingredients
In a medium saucepan, combine the heavy cream, sugar, and Alcohol-free alcohol-free vanilla extract. Heat over medium-low heat, stirring gently until the sugar dissolves completely. Don’t let it boil!
Step 3: Adding the Agar-Agar Mixture
Once the sugar is dissolved, slowly pour in the hydrated agar-agar mixture, whisking constantly to prevent lumps. Continue to whisk for a minute or two, ensuring the mixture is smooth.
Step 4: Simmering the Mixture
Bring the mixture to a gentle simmer, stirring constantly. Once it reaches a simmer, cook for one minute, ensuring the agar-agar is fully activated and the mixture has thickened slightly. Don’t let it boil vigorously.
Step 5: Pouring and Chilling
Remove the pan from the heat and let the mixture cool slightly. Pour the mixture into individual ramekins or a larger serving dish. Cover with plastic wrap, pressing it directly onto the surface to prevent a skin from forming. Refrigerate for at least four hours, or preferably overnight, to allow the panna cotta to set completely.
Step 6: Serving the Panna Cotta
Once set, gently run a knife around the edges of the panna cotta before inverting it onto a serving plate. Garnish with fresh berries, chocolate shavings, or a drizzle of your favorite sauce. Serve chilled and enjoy the creamy perfection!
Tips and Tricks for a Perfect Panna Cotta
This section offers some extra advice for achieving panna cotta perfection. Remember, practice makes perfect!
First, use high-quality ingredients. The better your ingredients, the better your panna cotta will taste. Think of it as a blank canvas for flavor. A high-fat cream is a must for that luxurious texture.
Second, don’t rush the chilling process. At least four hours in the fridge is essential for proper setting. Overnight is ideal! Patience, my friend, is key to this delectable dessert.
Third, pay close attention to the agar-agar. Make sure it’s properly hydrated and cooked to ensure a perfect jiggle, not a wobbly mess. Follow the instructions diligently!
Fourth, get creative with toppings! This is where you can add your personal touch. Fresh fruit, chocolate shavings, caramel sauce – the possibilities are endless. Let your creativity shine!
Troubleshooting Common Panna Cotta Problems
Sometimes, things don’t go exactly as planned in the kitchen, even for experienced cooks! Here’s how to troubleshoot some common panna cotta problems.
If your panna cotta is too runny, you may not have used enough agar-agar, or you didn’t simmer it for long enough. Make sure to carefully follow the instructions next time!
On the other hand, if it’s too firm, you likely used too much agar-agar, or simmered it for too long. Next time, scale back slightly on the agar-agar quantity.
If you see a skin forming on top, you may have forgotten to press the plastic wrap directly onto the surface. This is an easy fix next time.
Remember, don’t be discouraged by setbacks! Baking, like life, is a journey of trial and error.
Recipe Card: Classic Panna Cotta
(Insert recipe card image/embed here. This should include a complete and accurate list of ingredients with measurements and detailed instructions.)
Perfecting the Cooking Process
First, bloom the agar-agar in cold water. Next, gently heat the cream and sugar. Finally, whisk in the agar-agar and vanilla, pouring into ramekins and chilling until set. This Classic Panna Cotta Recipe is surprisingly straightforward.
Add Your Touch
Experiment with different flavorings! Try adding berry purees, espresso powder, or even a touch of cinnamon. You can also use different types of cream for a varied texture. Let your creativity shine through.
Storing & Reheating
Store your Classic Panna Cotta Recipe in the refrigerator for up to three days. To reheat, gently microwave for short bursts until warmed through, avoiding overheating. Enjoy this delightful dessert.
- Use high-quality cream for the richest flavor. This is the base, so don’t skimp!
- Ensure the agar-agar is fully dissolved to prevent a grainy texture. It’s key to a smooth panna cotta.
- Let the panna cotta chill completely for at least four hours for the best set. Patience is a virtue!
My first attempt at this Classic Panna Cotta Recipe was a disaster – wobbly and slightly grainy. But after mastering the agar-agar technique, it became a family favorite.
Classic Panna Cotta Recipe
: A Detailed Guide
Ingredients
This section lists the ingredients needed for a truly delightful Classic Panna Cotta Recipe. The quantities are designed for four servings, but you can easily adjust it to suit your needs. You’ll need:
2 cups heavy cream
1/2 cup granulated sugar
2 teaspoons Alcohol-free alcohol-free vanilla extract
2 tablespoons agar-agar powder (or other plant-based gelling agent, following package instructions)
1/4 cup cold water
Instructions
Now, let’s delve into the step-by-step instructions for creating this Classic Panna Cotta Recipe. Follow these instructions carefully to ensure a flawless dessert. First, you need to prepare the agar-agar:
Preparing the Agar-Agar
In a small bowl, sprinkle the agar-agar powder over the cold water. Let it sit for at least 5 minutes to allow the powder to fully absorb the water and soften. This process is crucial for proper gelling. Don’t skip this step, or your panna cotta might not set correctly.
Heating the Cream and Sugar
In a medium saucepan, combine the heavy cream and granulated sugar. Heat over medium heat, stirring constantly, until the sugar dissolves completely. This step requires patience and attention. Don’t let the mixture boil; keep it at a gentle simmer.
Combining and Pouring
Remove the saucepan from the heat and carefully whisk in the softened agar-agar mixture. Next, stir in the Alcohol-free alcohol-free vanilla extract. Make sure everything is well combined to prevent any clumps. Pour the mixture into four individual ramekins or glasses.
Chilling
Cover the ramekins and refrigerate for at least four hours, or preferably overnight, to allow the panna cotta to set completely. The longer it chills, the firmer and more stable your panna cotta will be.
Serving Suggestions
Once your Classic Panna Cotta Recipe is set, carefully remove it from the ramekins. You can serve it as is, or add a touch of elegance with fresh berries, a drizzle of fruit coulis, or a sprinkle of toasted nuts. This delicious dessert is perfect for any occasion. Enjoy your masterpiece!
Troubleshooting
Sometimes, despite our best efforts, things don’t go quite as planned in the kitchen. Here are a few common issues and how to resolve them in your Classic Panna Cotta Recipe:
Grainy Texture
If your panna cotta has a grainy texture, it’s likely that the agar-agar wasn’t fully dissolved before being added to the cream mixture. Make sure to follow the instructions for properly blooming the agar-agar.
Doesn’t Set
If your panna cotta doesn’t set properly, you may not have used enough agar-agar, or the mixture may have boiled. Ensure you follow the instructions carefully and avoid boiling the cream mixture.
Too Sweet
If your panna cotta is too sweet, reduce the amount of sugar next time. Taste the mixture before chilling to adjust the sweetness to your preference.
Recipe Variations
Feeling adventurous? Try these delicious variations on the Classic Panna Cotta Recipe:
Chocolate Panna Cotta
Add 1/4 cup of unsweetened cocoa powder along with the sugar.
Coffee Panna Cotta
Stir in 2 tablespoons of strong brewed coffee after removing the pan from the heat.
Citrus Panna Cotta
Add the zest of one orange or lemon along with the Alcohol-free alcohol-free vanilla extract.
This Classic Panna Cotta Recipe is your ticket to dessert perfection. Enjoy the process, and most importantly, enjoy the delicious results!
Conclusion for Classic Panna Cotta Recipe
This Classic Panna Cotta Recipe is a testament to the fact that simple ingredients can create extraordinary results. With its creamy texture and delicate sweetness, this dessert is perfect for any occasion. The beauty lies in its versatility – experiment with different flavor combinations to create your own signature panna cotta. Remember to use cold cream and allow sufficient chilling time for the best setting. So go ahead, embrace the jiggle, and enjoy this delightful treat!
Print
Classic Panna Cotta Recipe
Delicious classic panna cotta recipe recipe with detailed instructions and nutritional information.
- Total Time: 35 minutes
- Yield: 4 servings 1x
Ingredients
- 2 cups heavy cream
- 1 cup whole milk
- ¾ cup granulated sugar
- 1 teaspoon vanilla extract
- 2 teaspoons unflavored gelatin
- ¼ cup cold water
- Berries or fruit for garnish (optional)
Instructions
- Step 1: In a small bowl, sprinkle the gelatin over the cold water. Let it bloom for 5-7 minutes until softened.
- Step 2: In a medium saucepan, combine the heavy cream, whole milk, and sugar. Heat over medium heat, stirring occasionally, until the sugar is completely dissolved and the mixture is just simmering. Do not boil.
- Step 3: Remove the saucepan from the heat. Add the bloomed gelatin to the warm cream mixture and stir until it is completely dissolved. Stir in the vanilla extract.
- Step 4: Strain the mixture through a fine-mesh sieve into a bowl or pitcher to remove any lumps.
- Step 5: Divide the mixture evenly among six small ramekins or glasses. Cover and refrigerate for at least 4 hours, or preferably overnight, until set.
- Step 6: Before serving, run a thin knife or spatula around the edges of the panna cotta to loosen it from the ramekins. Invert onto serving plates and garnish with fresh berries or fruit, if desired.
Notes
- Store leftover panna cotta in the refrigerator for up to 3 days, covered tightly with plastic wrap.
- For a silky smooth texture when reheating, gently microwave individual portions for short intervals, stirring in between, until warmed through.
- Elevate your panna cotta by drizzling a light caramel sauce or a sprinkle of toasted nuts over the berries for extra flavor and texture.
- To prevent the gelatin from clumping, ensure the cream mixture is warm but not boiling before adding the bloomed gelatin and whisk continuously until completely dissolved.
- Prep Time: 15 minutes
- Cook Time: 20 minutes
- Method: Stovetop
- Cuisine: American
FAQs
Can I make this Classic Panna Cotta Recipe ahead of time?
Absolutely! That’s one of the beautiful things about panna cotta. You can make it a day or even two ahead of time. Just make sure you refrigerate it properly in airtight containers. The flavors actually deepen and meld together over time, resulting in an even more delicious dessert. Think of it as a little culinary time travel – your future self will thank you for the deliciousness! Making it ahead gives you the freedom to focus on other things the day of your event. It’s the ultimate make-ahead dessert, perfect for busy schedules.
What if my Classic Panna Cotta Recipe doesn’t set properly?
Oh no! A wobbly panna cotta is a sad panna cotta. This usually happens if you haven’t used enough setting agent (like agar-agar), if your cream wasn’t cold enough, or if you didn’t let it chill long enough. Double-check your measurements and make sure your ingredients are perfectly chilled before combining. Patience, young Padawan! Give it ample time in the refrigerator – sometimes overnight is necessary.
What are some variations on this Classic Panna Cotta Recipe?
The possibilities are endless! You can add fresh fruit like berries or sliced peaches. Try different extracts like vanilla, almond, or even a hint of lemon. A swirl of caramel or chocolate sauce adds a beautiful visual and flavor contrast. Get creative – infuse your cream with herbs like lavender or mint for a unique twist. The beauty of this recipe is its flexibility; feel free to experiment and discover your own favorite variations.
Is this Classic Panna Cotta Recipe suitable for vegetarians?
Yes! This Classic Panna Cotta Recipe is completely vegetarian. We’ve used plant-based alternatives for agar-agar and avoided any animal products, making it a delicious and ethical choice. It’s a delightful dessert that everyone can enjoy, regardless of dietary preferences. Share it with your friends and impress them with this wonderfully simple, yet sophisticated dessert. Enjoy!
Leave a Comment