
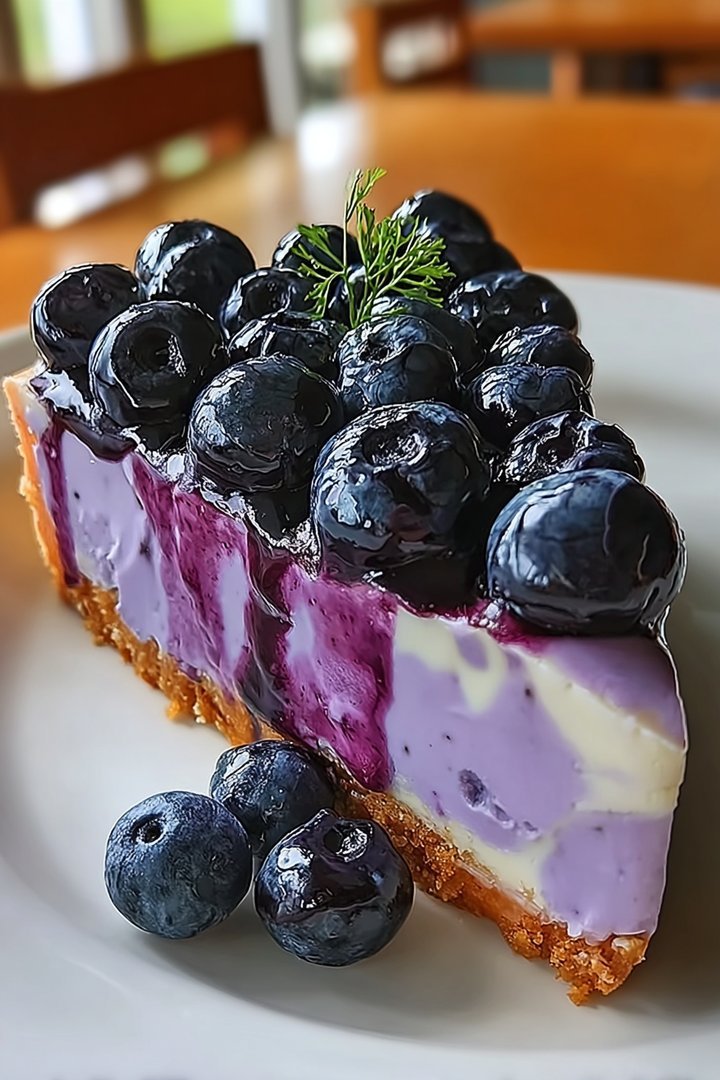
Imagine sinking your fork into a cloud of creamy decadence, bursting with the sweet-tart jewels of summer. This Blueberry Dream Cheesecake isn’t just dessert; it’s a flavor adventure you won’t soon forget.
This is the cheesecake that will make you the star of any gathering, a symphony of textures and tastes that dance on your palate. Prepare for an experience that redefines what cheesecake can be.
Here are just a few reasons why this Blueberry Dream Cheesecake will become your new go-to dessert:
- Effortlessly combines a smooth, creamy cheesecake filling with a vibrant, fruity blueberry topping for a delightful sweet treat.
- The flavor profile balances rich, tangy cheesecake with the refreshing sweetness of blueberries, creating a harmonious and unforgettable taste.
- With its stunning layers of creamy white and luscious purple, this cheesecake is as beautiful to look at as it is to eat.
- Perfect for any occasion, from casual family dinners to elegant dinner parties, its versatility is guaranteed to impress everyone.
Ingredients for Blueberry Dream Cheesecake
Here’s what you’ll need to make this delicious dish:
The full ingredients list, including measurements, is provided in the recipe card directly below.
How to Make Blueberry Dream Cheesecake
Follow these simple steps to prepare this delicious dish:
Step 1: Prepare the Graham Cracker Crust
Preheat oven to 350°F (175°C). In a food processor, pulse graham crackers until finely crushed. In a medium bowl, mix the crushed graham crackers with melted butter until well combined. Press the mixture firmly into the bottom of a 9-inch springform pan. Bake for 8-10 minutes, then let cool.
Step 2: Make the Cheesecake Filling
In a large mixing bowl, beat softened cream cheese and granulated sugar until smooth and creamy. Add eggs one at a time, mixing well after each addition. Stir in Alcohol-free alcohol-free vanilla extract and sour cream until just combined.
Step 3: Assemble and Bake the Cheesecake
Pour the cheesecake filling over the cooled graham cracker crust, spreading evenly. Bake in the preheated oven for 55-65 minutes, or until the edges are set but the center still has a slight jiggle. Turn off the oven and let the cheesecake cool inside for 1 hour.
Step 4: Prepare the Blueberry Topping
While the cheesecake is cooling, prepare the blueberry topping. In a medium saucepan, combine fresh blueberries, granulated sugar, cornstarch, and lemon juice. Cook over medium heat, stirring constantly, until the blueberries burst and the mixture thickens, about 5-7 minutes. Let cool slightly.
Step 5: Chill and Serve
After the cheesecake has cooled in the oven, remove it and let it cool completely at room temperature. Spread the blueberry topping evenly over the cheesecake. Cover and refrigerate for at least 4 hours, or preferably overnight, before serving.
Step 6: Enjoy Your Blueberry Dream Cheesecake
Before serving, carefully remove the sides of the springform pan. Slice and serve chilled. Garnish with additional fresh blueberries or a dollop of whipped cream for an extra touch of elegance.
Perfecting the Cooking Process
To achieve the ultimate Blueberry Dream Cheesecake, start with the crust, then make the filling while it bakes and cools. Prepare the blueberry topping last, allowing flavors to meld beautifully. This ensures a harmonious blend of textures and tastes in every bite.
Add Your Touch
Feel free to swap out the graham crackers for almond flour to make it gluten-free. A little lemon zest in the filling can add brightness, or a sprinkle of lavender to the blueberry topping introduces floral notes. Let your creativity run wild!
Storing & Reheating
Store your Blueberry Dream Cheesecake covered in the refrigerator for up to 5 days. While reheating isn’t recommended, allowing it to sit at room temperature for 15 minutes before serving can enhance its creamy texture and flavors.
Here are some helpful tips to achieve cheesecake perfection:
- Ensure all your cream cheese is at room temperature. This prevents lumps and guarantees a smooth, velvety texture.
- Don’t overbake the cheesecake; a slight jiggle in the center is what you want. It will firm up as it cools, I promise!
- Allow the cheesecake to cool completely in the oven with the door ajar to prevent cracking. Patience is key for success.
(Personal anecdote formated as paragraph subheading)
I once made this for a friend’s birthday, and they swore it was the best cheesecake they’d ever had. The silence as they savored each bite was truly the highest praise I could receive.
The Allure of the Blueberry Dream Cheesecake
Let’s be honest: cheesecake is already pretty spectacular. It’s rich, it’s creamy, it’s decadent. But sometimes, you just need a little something extra to elevate it to the next level, right? That’s where the Blueberry Dream Cheesecake comes in. It’s not just cheesecake; it’s an experience, a symphony of flavors that dance on your tongue and leave you craving more.
Now, I know what you might be thinking: “Cheesecake? Sounds intimidating!” And I get it. We’ve all seen those cheesecake fails, the cracked tops, the grainy textures, the sheer disappointment. But fear not, my friends! This recipe is designed to be foolproof, even for the most novice baker. With a few simple steps and a little bit of love, you’ll be whipping up a Blueberry Dream Cheesecake that will impress your friends, your family, and most importantly, yourself.
Why Blueberries? Why Now?
Why blueberries, you ask? Well, besides being absolutely delicious, blueberries are little powerhouses of flavor and antioxidants. They add a burst of freshness and a vibrant pop of color to the creamy canvas of the cheesecake. Plus, that sweet-tart flavor profile perfectly complements the richness of the cheese, creating a harmonious balance that will have you saying, “Mmm, what sorcery is this?”
And why now? Because there’s never a bad time for cheesecake, especially one as dreamy as this. Whether it’s a special occasion, a weekend treat, or just a Tuesday pick-me-up (because let’s face it, Tuesdays need all the help they can get), the Blueberry Dream Cheesecake is always a good idea. So, grab your apron, preheat your oven, and let’s get baking!
The Anatomy of a Dreamy Cheesecake
Before we dive into the recipe, let’s break down the components of this masterpiece. We’ve got the crust, the filling, and the topping. Each element plays a crucial role in creating the ultimate cheesecake experience, so let’s take a closer look.
- **The Crust:** A sturdy and flavorful foundation that provides a delightful contrast to the creamy filling. We’re using a classic graham cracker crust for its simplicity and satisfying crunch.
- **The Filling:** The heart and soul of the cheesecake. This is where the magic happens. A blend of cream cheese, sugar, eggs, and a touch of vanilla create a velvety smooth texture and a rich, decadent flavor.
- **The Topping:** The crowning glory. The blueberry topping adds a burst of freshness, sweetness, and a beautiful pop of color. It’s the perfect finishing touch to elevate this cheesecake to dream status.
Crafting the Crust: The Foundation of Flavor
Let’s start with the crust, the unsung hero of this dessert. A good crust is essential for providing a sturdy base and a satisfying crunch that complements the creamy filling.
For this recipe, we’re going with a classic graham cracker crust. It’s easy to make, perfectly sweet, and provides a delightful textural contrast to the smooth cheesecake filling. If you’re feeling adventurous, you can experiment with other crust options, such as almond flour for a gluten-free version or even crushed vanilla wafers for a sweeter twist.
Crust Ingredients
- 1 ½ cups graham cracker crumbs
- 5 tablespoons unsalted butter, melted
- ¼ cup granulated sugar
Crust Instructions
1. Preheat your oven to 350°F (175°C).
2. In a medium bowl, combine the graham cracker crumbs, melted butter, and sugar. Mix well until the crumbs are evenly moistened.
3. Press the mixture firmly into the bottom of a 9-inch springform pan. Use the bottom of a measuring cup to ensure an even and compact crust.
4. Bake for 8-10 minutes, or until the crust is lightly golden.
5. Remove from the oven and let cool completely.
Whisking the Dream: The Cheesecake Filling
Now for the star of the show: the cheesecake filling. This is where the magic truly happens. We’re aiming for a velvety smooth texture, a rich, decadent flavor, and a perfectly balanced sweetness.
The key to a successful cheesecake filling is using high-quality ingredients and following a few simple techniques. Make sure your cream cheese is at room temperature to prevent lumps, and don’t overmix the batter, as this can incorporate too much air and cause the cheesecake to crack during baking.
Filling Ingredients
- 32 ounces cream cheese, room temperature
- 1 ½ cups granulated sugar
- 1 teaspoon Alcohol-free alcohol-free vanilla extract
- ½ teaspoon lemon zest (optional)
- 4 large eggs
Filling Instructions
1. In a large bowl, beat the cream cheese and sugar with an electric mixer until smooth and creamy.
2. Add the Alcohol-free alcohol-free vanilla extract and lemon zest (if using) and mix well.
3. Add the eggs one at a time, beating well after each addition. Be careful not to overmix.
4. Pour the filling over the cooled crust in the springform pan.
5. Bake for 55-70 minutes, or until the edges are set and the center jiggles slightly.
6. Turn off the oven and let the cheesecake cool in the oven with the door ajar for 1 hour. This helps prevent cracking.
7. Remove from the oven and let cool completely at room temperature.
8. Cover and refrigerate for at least 4 hours, or preferably overnight, before serving.
Blueberry Bliss: The Topping That Takes It All the Way
Finally, let’s add the crowning glory: the blueberry topping. This is what transforms a simple cheesecake into a Blueberry Dream Cheesecake. The fresh, sweet-tart flavor of the blueberries perfectly complements the richness of the filling, creating a delightful symphony of flavors in every bite.
You can use fresh or frozen blueberries for this topping, depending on what’s available and in season. If using frozen blueberries, be sure to thaw them completely and drain any excess liquid before adding them to the saucepan.
Topping Ingredients
- 4 cups fresh or frozen blueberries
- ½ cup granulated sugar
- 2 tablespoons cornstarch
- ¼ cup water
- 1 tablespoon lemon juice
Topping Instructions
1. In a medium saucepan, combine the blueberries, sugar, cornstarch, and water.
2. Bring to a boil over medium heat, stirring constantly.
3. Reduce heat and simmer for 5-7 minutes, or until the blueberries have softened and the sauce has thickened.
4. Stir in the lemon juice.
5. Let the topping cool completely.
6. Spoon the blueberry topping over the chilled cheesecake.
7. Serve and enjoy!
Serving and Savoring Your Masterpiece
Now that you’ve created this culinary masterpiece, it’s time to serve and savor the fruits (or berries!) of your labor.
Before serving, carefully remove the cheesecake from the springform pan. A thin knife run around the edge can help loosen it. Slice the cheesecake into wedges and serve with a generous dollop of whipped cream or a scoop of vanilla ice cream, if desired.
And most importantly, don’t forget to take a moment to appreciate your creation. Admire the beautiful blueberry topping, the smooth, creamy texture, and the aroma that fills the air. This Blueberry Dream Cheesecake is a testament to your baking skills, and it’s meant to be enjoyed and shared with loved ones.
So go ahead, take a bite. Close your eyes and let the flavors transport you to a place of pure bliss. You deserve it!
Troubleshooting Your Cheesecake Dreams
Even with the best recipe, baking can sometimes be a little unpredictable. Here are some common cheesecake problems and how to fix them:
- **Cracked Cheesecake:** This is often caused by baking the cheesecake at too high a temperature or cooling it too quickly. To prevent cracking, bake the cheesecake at a lower temperature and let it cool slowly in the oven with the door ajar.
- **Grainy Texture:** This is usually caused by overmixing the batter. Be careful not to overmix, and make sure your cream cheese is at room temperature before starting.
- **Soggy Crust:** This can happen if the crust isn’t baked long enough or if the filling is too moist. Make sure to bake the crust until it’s lightly golden, and avoid adding too much liquid to the filling.
- **Cheesecake Sinks:** Over mixing can cause the cheesecake to sink, so be careful when mixing.
With a little bit of practice and these troubleshooting tips, you’ll be able to bake the perfect Blueberry Dream Cheesecake every time. Happy baking!
Conclusion for Blueberry Dream Cheesecake :
This Blueberry Dream Cheesecake is a delightful dessert that’s surprisingly easy to make. The creamy, tangy cheesecake base perfectly complements the sweet and slightly tart blueberry swirl. Whether you’re using fresh or frozen blueberries, the burst of flavor in every bite is irresistible. Remember the tips for preventing cracks and proper storage, and you’ll have a show-stopping dessert that everyone will rave about. So, gather your ingredients and get ready to create a Blueberry Dream Cheesecake that’s as delicious as it is beautiful.
Print
Blueberry Dream Cheesecake
Delicious blueberry dream cheesecake recipe with detailed instructions and nutritional information.
- Total Time: 35 minutes
- Yield: 4 servings
Ingredients
- Graham cracker crumbs: 1 1/2 cups
- Unsalted butter, melted: 6 tablespoons
- Cream cheese, softened: 32 ounces (4 packages)
- Granulated sugar: 1 1/4 cups
- Large eggs: 4
- Vanilla extract: 1 teaspoon
- Sour cream: 1 cup
- Fresh or frozen blueberries: 2 cups
Instructions
- Step 1: Preheat oven to 350°F (175°C). In a medium bowl, combine graham cracker crumbs and melted butter. Press mixture into the bottom of a 9-inch springform pan.
- Step 2: In a large bowl, beat cream cheese and sugar until smooth and creamy. Beat in eggs one at a time, then stir in vanilla extract and sour cream until well combined.
- Step 3: Gently fold in 1 1/2 cups of the blueberries into the cream cheese mixture.
- Step 4: Pour the cream cheese mixture over the graham cracker crust. Sprinkle the remaining 1/2 cup of blueberries on top.
- Step 5: Bake for 55-70 minutes, or until the cheesecake is set around the edges but still slightly jiggly in the center. Turn off the oven and let the cheesecake cool in the oven with the door slightly ajar for 1 hour.
- Step 6: Remove the cheesecake from the oven and let it cool completely at room temperature. Then, cover and refrigerate for at least 4 hours, or preferably overnight, before serving.
Notes
- For neat slices, chill the cheesecake completely before cutting with a warm, damp knife.
- Store leftover cheesecake, tightly covered, in the refrigerator for up to 5 days to maintain its creamy texture.
- Top each slice with a dollop of whipped cream and a sprinkle of extra blueberries for an elegant presentation.
- Avoid overbaking: the cheesecake should still have a slight wobble in the center when removed from the oven to prevent cracking.
- Prep Time: 15 minutes
- Cook Time: 20 minutes
- Method: Stovetop
- Cuisine: American
FAQs :
Can I use frozen blueberries for this Blueberry Dream Cheesecake?
Absolutely! Frozen blueberries work wonderfully in this recipe. There’s no need to thaw them beforehand; just toss them right into the blueberry swirl mixture. Using frozen berries is actually convenient because they often release less juice than fresh berries, which helps prevent a soggy cheesecake. If you are really worried about excess moisture, toss them with a tablespoon of cornstarch before adding them to the batter. It’s a simple trick that guarantees a perfect, creamy Blueberry Dream Cheesecake every time. Plus, frozen blueberries are available year-round, so you can satisfy that cheesecake craving anytime!
How do I prevent cracks on the surface of my Blueberry Dream Cheesecake?
Cracking is a common cheesecake woe, but fear not! To avoid fissures in your delicious Blueberry Dream Cheesecake, bake it in a water bath. Wrap the springform pan tightly in aluminum foil to prevent water from seeping in, then place it in a larger pan filled with hot water that reaches about halfway up the sides. The steam from the water bath ensures even baking and prevents the cheesecake from drying out too quickly. Another tip is to cool the cheesecake slowly in the oven after baking, cracking the door slightly to release heat gradually.
What’s the best way to store leftover Blueberry Dream Cheesecake?
Storing leftover Blueberry Dream Cheesecake is a breeze. Simply cover the cheesecake tightly with plastic wrap or aluminum foil and refrigerate it. It will stay fresh and delicious for up to five days. If you want to freeze it, slice the cheesecake into individual portions, wrap each slice in plastic wrap, then place them in a freezer-safe container. Frozen cheesecake can last for up to two months. When you’re ready to enjoy a slice, thaw it in the refrigerator overnight for the best texture.
Can I make this Blueberry Dream Cheesecake recipe ahead of time?
You absolutely can prepare this Blueberry Dream Cheesecake in advance! In fact, it’s often better if you do. Making it a day or two ahead of serving allows the flavors to meld together beautifully, and it gives the cheesecake ample time to chill and set properly. After baking, let it cool completely, then cover it tightly and refrigerate it. This make-ahead approach is especially helpful when you’re hosting a party or simply want to get a head start on dessert preparations. Just remember to keep it covered to maintain its creamy goodness.


Leave a Comment