
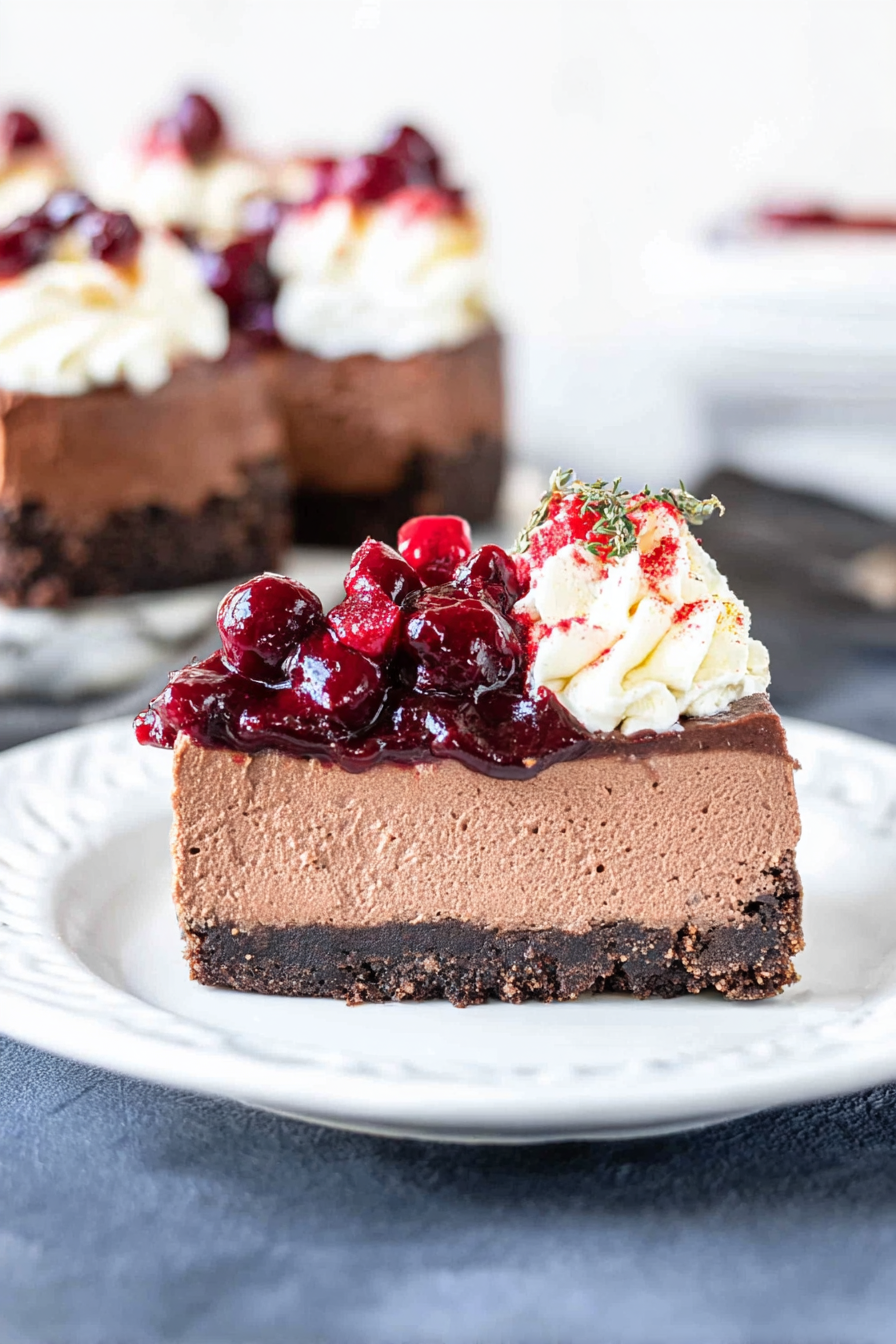
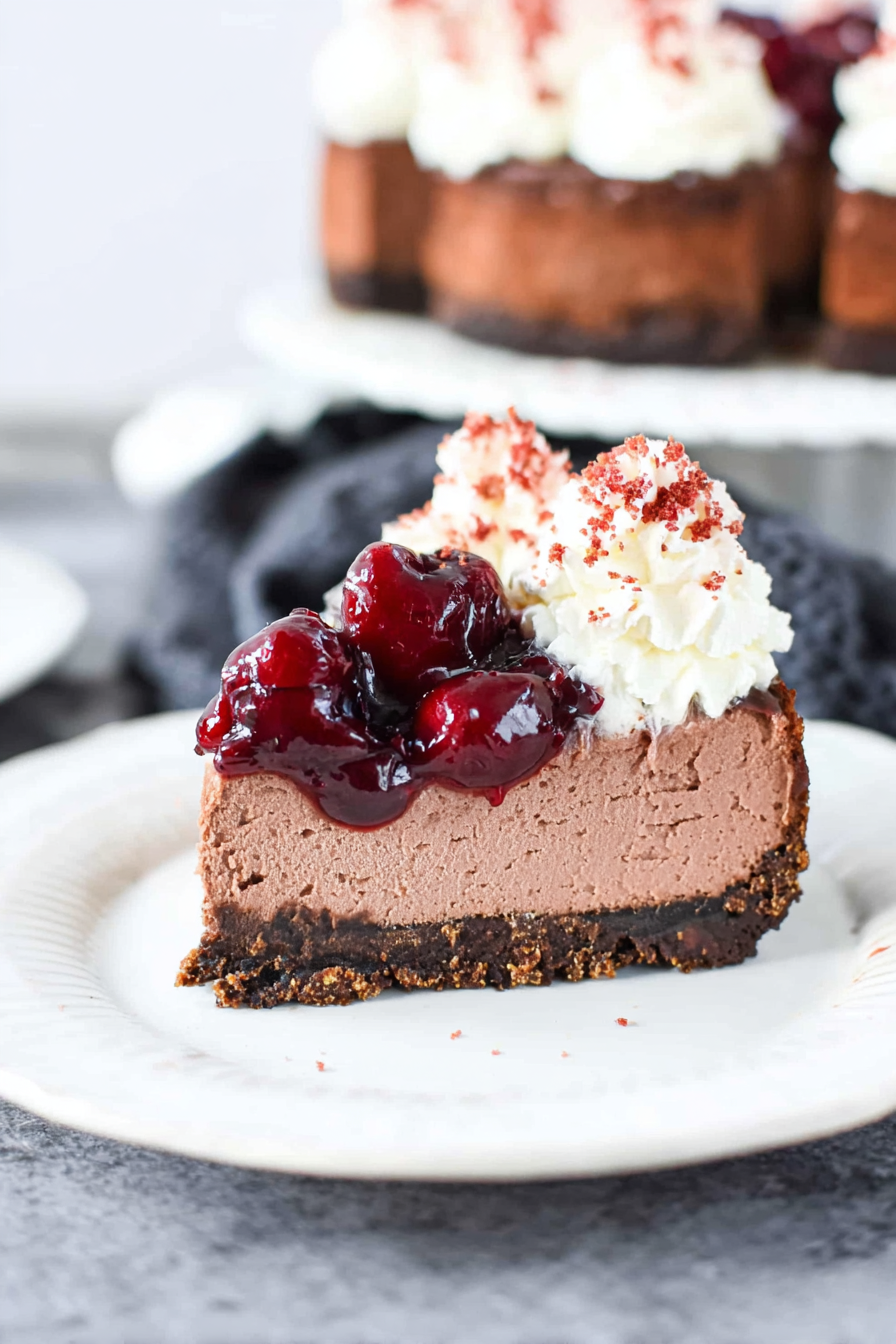
Imagine biting into a slice of pure bliss, where the richness of chocolate meets the tangy sweetness of cherries. This Black Forest Cheesecake is not just a dessert; it’s an experience, a symphony of flavors that dance on your palate and leave you craving more.
It’s the kind of treat that turns an ordinary afternoon into a celebration, a simple gathering into a memorable event. Picture layers of creamy cheesecake, decadent chocolate, and juicy cherries intertwining to create a dessert that is as visually stunning as it is delicious.
Here are a few reasons why this Black Forest Cheesecake will become your new favorite:
- Effortlessly combines the classic flavors of Black Forest cake into a luscious cheesecake, simplifying a typically complex dessert.
- The striking contrast of rich chocolate, tangy cherries, and creamy cheesecake creates a flavor profile that is both indulgent and refreshing.
- Its elegant layers and beautiful presentation make it a show-stopping centerpiece for any occasion, impressing your guests with minimal effort.
- Adaptable for any time of year, this cheesecake can be customized with seasonal fruits, making it a versatile and delightful treat for any gathering.
Ingredients for Black Forest Cheesecake
Here’s what you’ll need to make this delicious dish:
The full ingredients list, including measurements, is provided in the recipe card directly below.
How to Make Black Forest Cheesecake
Follow these simple steps to prepare this delicious dish:
Step 1: Prepare the Chocolate Crust
Combine the chocolate cookie crumbs and melted butter in a bowl. Press the mixture firmly into the bottom of a springform pan to create an even crust.
Step 2: Mix the Cheesecake Filling
In a large bowl, beat the softened cream cheese and sugar until smooth. Add the eggs one at a time, mixing well after each addition. Stir in the sour cream, Alcohol-free alcohol-free vanilla extract, and cocoa powder until everything is well combined and creamy.
Step 3: Assemble the Cheesecake
Pour half of the cheesecake filling over the chocolate crust. Spoon a layer of cherry pie filling over the cheesecake layer, spreading it evenly. Pour the remaining cheesecake filling over the cherry layer.
Step 4: Bake the Cheesecake
Bake in a preheated oven at 325°F (160°C) for 60-70 minutes, or until the edges are set but the center still has a slight wobble. Turn off the oven and let the cheesecake cool inside the oven with the door slightly ajar for an hour to prevent cracking.
Step 5: Chill and Garnish
Remove the cheesecake from the oven and let it cool completely on a wire rack. Cover it with plastic wrap and refrigerate for at least 4 hours, or preferably overnight, to allow the flavors to meld and the cheesecake to set completely.
Step 6: Serve
Before serving, garnish the Black Forest Cheesecake with fresh cherries. Slice and serve this decadent dessert, enjoying the creamy, chocolatey, and cherry-filled delight!
Perfecting the Cooking Process
To achieve cheesecake nirvana, orchestrate your baking like a culinary symphony. First, whip up the crust while the oven preheats, then prepare the creamy filling. Finally, the cherries get their moment just before baking for that perfect burst of flavor in this Black Forest Cheesecake.
Add Your Touch
Feel free to get creative! Swap out the standard cherries for raspberries or blackberries for a different berry burst. A hint of alcohol-free alcohol-free almond extract can deepen the nutty notes, and a sprinkle of cocoa powder in the crust adds an extra layer of chocolatey goodness to your Black Forest Cheesecake adventure.
Storing & Reheating
Once your masterpiece has cooled, wrap it securely and store it in the refrigerator for up to five days. Leftovers are best enjoyed cold, straight from the fridge, or you can let them sit at room temperature for a few minutes for a slightly softer texture.
Here are a few tips to help you on your Black Forest Cheesecake baking journey:
- To prevent cracks, bake your Black Forest Cheesecake in a water bath. This gentle, even heat ensures a smooth, creamy texture.
- Don’t overmix the cheesecake filling! Overmixing incorporates too much air, which can cause the cheesecake to puff up and then collapse.
- Be patient and allow the cheesecake to cool completely in the oven with the door ajar to further prevent cracking.
(Personal anecdote formated as paragraph subheading)
My first attempt at this cheesecake was a disaster – it cracked worse than the Liberty Bell! But after a bit of research and a lot of practice, I finally nailed it, and now it’s a family favorite.
The Allure of the Black Forest Cheesecake
There’s just something undeniably captivating about a Black Forest Cheesecake. Is it the rich, decadent chocolate? Perhaps the sweet and tart cherries that burst with flavor? Or maybe it’s the creamy, dreamy cheesecake base that ties it all together? Whatever the reason, this dessert has a way of making any occasion feel special. We all know how that is.
Imagine this: a velvety smooth cheesecake, swirled with the deep, dark allure of chocolate and studded with juicy, plump cherries. It’s a symphony of flavors and textures that dance on your tongue, leaving you wanting more with each bite. It’s more than just a dessert; it’s an experience. Black Forest Cheesecake has become the star of many birthdays.
The History of the Black Forest
The Black Forest region of Germany, with its dense forests and picturesque villages, is the namesake of this iconic dessert. While the exact origins are debated, it’s believed that the combination of cherries, chocolate, and cream originated in this region, where these ingredients were readily available. In this context, the term Black Forest Cheesecake is a re-imagining of the famous Black Forest Cake.
The cake, traditionally known as Schwarzwälder Kirschtorte, typically features layers of chocolate cake soaked in cherry apple juice with apple juice with brandy extract extract (kirschwasser), whipped cream, and cherries. This Black Forest Cheesecake recipe pays homage to those classic flavors, transforming them into a luscious cheesecake that is accessible to everyone.
Gathering Your Ingredients for Black Forest Cheesecake
Before you embark on your cheesecake adventure, make sure you have all the necessary ingredients. This recipe uses readily available ingredients. There is no need to search for rare goods. Let’s get started:
**For the Crust: **
- 1 1/2 cups chocolate wafer crumbs (about 30 wafers)
- 5 tablespoons unsalted butter, melted
- 2 tablespoons granulated sugar
**For the Filling: **
- 3 (8-ounce) packages cream cheese, softened
- 1 1/4 cups granulated sugar
- 1 teaspoon Alcohol-free alcohol-free vanilla extract
- 1/2 teaspoon alcohol-free alcohol-free almond extract (optional, but highly recommended)
- 3 large eggs
- 1/4 cup sour cream
- 1/4 cup unsweetened cocoa powder
**For the Cherry Topping: **
- 1 (21-ounce) can cherry pie filling
- 1 tablespoon cornstarch
- 2 tablespoons cherry juice
**For Decoration (Optional): **
- Whipped cream
- Chocolate shavings
- Fresh cherries
Crafting the Chocolate Crumb Crust
Let’s start with the foundation of our masterpiece: the chocolate crumb crust. This step is super important because it sets the tone for the entire cheesecake. The rich chocolate flavor complements the creamy filling and adds a delightful textural contrast.
1. In a medium bowl, combine the chocolate wafer crumbs, melted butter, and sugar. Mix well until the crumbs are evenly moistened.
2. Press the mixture firmly into the bottom of a 9-inch springform pan. You can use the bottom of a measuring cup or your fingers to create an even layer.
3. Bake the crust in a preheated oven at 350°F (175°C) for 8-10 minutes. This will help set the crust and prevent it from becoming soggy.
4. Remove the crust from the oven and let it cool completely before adding the filling.
Whipping Up the Creamy Filling
Now for the star of the show: the cheesecake filling. This is where the magic happens, and where that signature Black Forest Cheesecake flavor truly shines. The key to a perfect cheesecake is to ensure all the ingredients are properly combined and that the filling is smooth and creamy.
1. In a large bowl, beat the softened cream cheese with an electric mixer until smooth and fluffy. This may take a few minutes, but be patient – a smooth cream cheese base is essential.
2. Gradually add the sugar, beating until well combined.
3. Stir in the Alcohol-free alcohol-free vanilla extract and alcohol-free alcohol-free almond extract (if using). The alcohol-free alcohol-free almond extract enhances the cherry flavor and adds a subtle nutty note to the cheesecake.
4. Add the eggs one at a time, beating well after each addition. Be careful not to overmix the batter, as this can cause the cheesecake to crack during baking.
5. Stir in the sour cream and cocoa powder. Mix until everything is evenly combined and the batter is smooth and chocolatey.
Preparing the Cherry Topping
No Black Forest Cheesecake is complete without a luscious cherry topping. This step adds a burst of fruity flavor and a beautiful visual appeal to the dessert.
1. In a small saucepan, combine the cherry pie filling, cornstarch, and cherry juice.
2. Cook over medium heat, stirring constantly, until the mixture thickens and becomes glossy.
3. Remove from heat and let the cherry topping cool slightly before pouring it over the cheesecake.
Assembling and Baking Your Black Forest Cheesecake
With all the components ready, it’s time to assemble and bake your Black Forest Cheesecake. This step requires patience and attention to detail, but the results are well worth the effort.
1. Pour the cheesecake filling over the cooled chocolate crumb crust.
2. Gently spread the filling evenly over the crust.
3. Spoon the cherry topping over the cheesecake filling.
4. Swirl the cherry topping into the cheesecake filling using a knife or skewer. This creates a beautiful marbled effect and ensures that the cherry flavor is evenly distributed throughout the cheesecake.
5. Bake the cheesecake in a preheated oven at 325°F (160°C) for 60-70 minutes, or until the edges are set and the center is slightly jiggly.
6. Turn off the oven and let the cheesecake cool in the oven with the door ajar for at least 1 hour. This helps prevent the cheesecake from cracking.
7. Remove the cheesecake from the oven and let it cool completely at room temperature.
8. Cover the cheesecake with plastic wrap and refrigerate for at least 4 hours, or preferably overnight, before serving.
Serving and Enjoying Your Black Forest Cheesecake
Finally, the moment you’ve been waiting for: serving and enjoying your homemade Black Forest Cheesecake. This dessert is best served chilled, with a dollop of whipped cream, chocolate shavings, and fresh cherries for garnish.
1. Remove the cheesecake from the springform pan.
2. Slice the cheesecake into wedges.
3. Serve with whipped cream, chocolate shavings, and fresh cherries, if desired.
4. Enjoy every bite of your decadent and delicious Black Forest Cheesecake!
Substitutions and Variations for Black Forest Cheesecake
Want to put your own unique spin on this Black Forest Cheesecake recipe? Here are a few substitutions and variations to try:
- **Crust:** Use graham cracker crumbs instead of chocolate wafer crumbs for a milder flavor.
- **Filling:** Add a tablespoon of cherry juice to the cheesecake filling for an extra burst of cherry flavor.
- **Topping:** Use fresh cherries instead of cherry pie filling for a more natural and less processed topping.
- **Chocolate:** Add chocolate chips to the filling for a richer chocolate experience.
- **Nuts:** Sprinkle chopped almonds or pecans over the top of the cheesecake for added crunch.
Troubleshooting Common Cheesecake Issues
Cheesecake can be a bit finicky, but don’t let that intimidate you. Here are a few common issues and how to fix them:
- **Cracking:** Prevent cracking by baking the cheesecake in a water bath and cooling it slowly in the oven.
- **Soggy Crust:** Prevent a soggy crust by baking it before adding the filling.
- **Lumpy Filling:** Ensure your cream cheese is completely softened before mixing the filling.
- **Overbaking:** Overbaking can result in a dry and crumbly cheesecake. Use an oven thermometer to ensure accurate temperature.
The Perfect Dessert for Any Occasion
Whether you’re celebrating a special occasion or simply craving a decadent treat, Black Forest Cheesecake is the perfect choice. Its rich, chocolatey flavor and creamy texture are sure to impress your friends and family. So go ahead, gather your ingredients, and get ready to bake the best cheesecake you’ve ever tasted! This Black Forest Cheesecake recipe is an absolute keeper!
Conclusion for Black Forest Cheesecake :
This Black Forest Cheesecake recipe delivers a luscious, creamy dessert with a delightful cherry kick. Remember the crucial steps: the water bath for crack-free perfection, the quality chocolate for intense flavor, and fresh cherries for that signature taste. Whether you stick to the classic or add your personal touch with different fruits, this cheesecake will surely impress. Enjoy this delightful dessert!
Print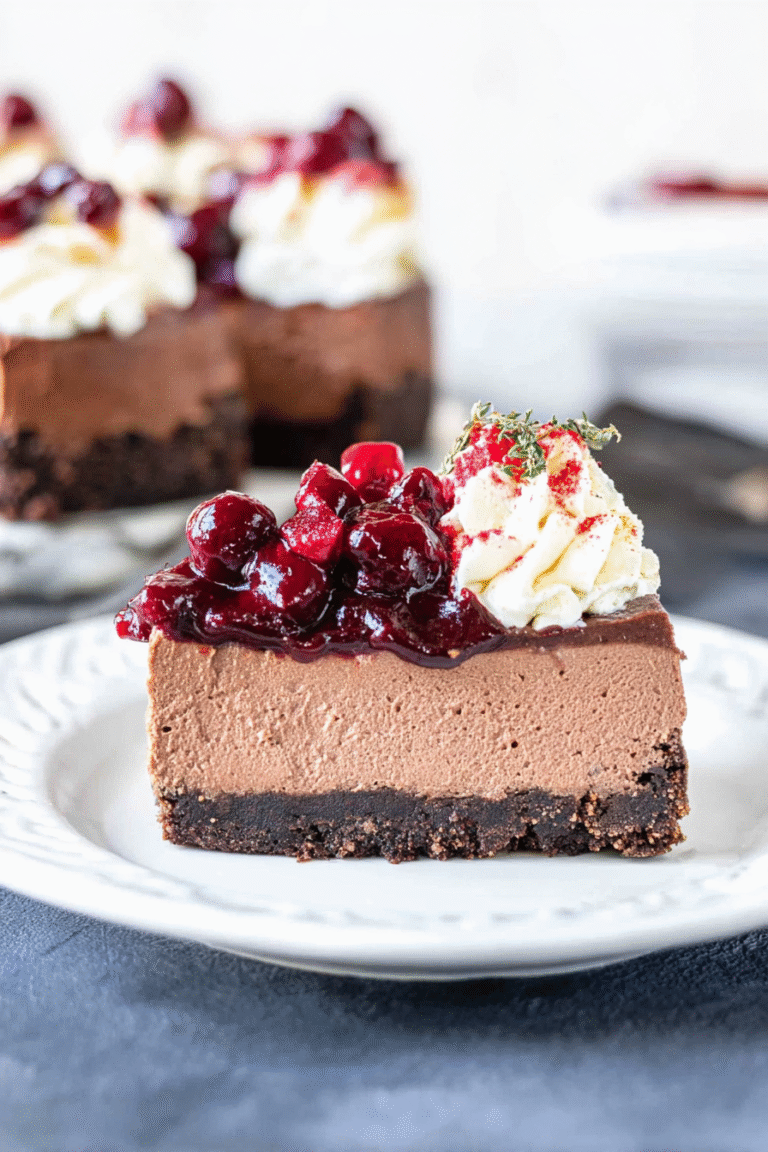
Black Forest Cheesecake
Delicious black forest cheesecake recipe with detailed instructions and nutritional information.
- Total Time: 35 minutes
- Yield: 4 servings
Ingredients
- Chocolate graham cracker crumbs: 1 1/2 cups
- Unsalted butter, melted: 6 tablespoons
- Cream cheese, softened: 32 ounces (4 packages)
- Granulated sugar: 1 1/4 cups
- Eggs: 4 large
- Sour cream: 1 cup
- Vanilla extract: 2 teaspoons
- Canned cherry pie filling: 21 ounces
Instructions
- Step 1: Preheat oven to 350°F (175°C). In a bowl, combine graham cracker crumbs and melted butter. Press mixture into the bottom of a 9-inch springform pan. Bake for 10 minutes; let cool slightly.
- Step 2: In a large bowl, beat cream cheese and sugar until smooth and creamy. Add eggs one at a time, mixing well after each addition. Stir in sour cream and vanilla extract until just combined. Do not overmix.
- Step 3: Pour cream cheese mixture over the cooled crust. Gently spoon cherry pie filling over the cream cheese mixture, swirling lightly with a knife to create a marbled effect.
- Step 4: Bake for 55-70 minutes, or until the center is just slightly jiggly. Turn off the oven and let the cheesecake cool in the oven for 1 hour with the door slightly ajar.
- Step 5: Remove cheesecake from oven and let cool completely on a wire rack. Refrigerate for at least 4 hours, or preferably overnight, before serving.
Notes
- Store leftover cheesecake, tightly covered, in the refrigerator for up to 5 days.
- While not traditionally reheated, a small slice can be brought to room temperature for about 15 minutes to enhance the creamy texture.
- Serve chilled with a dollop of whipped cream and a fresh cherry on top for an extra touch of elegance.
- To prevent cracks, bake the cheesecake in a water bath by placing the springform pan inside a larger pan filled with about an inch of hot water.
- Prep Time: 15 minutes
- Cook Time: 20 minutes
- Method: Stovetop
- Cuisine: American
FAQs :
Can I use a different type of fruit in my Black Forest Cheesecake?
Absolutely! While cherries are the classic choice, feel free to experiment. Raspberries, strawberries, or even a mix of berries would work beautifully. Just remember that the flavor profile will change slightly. For example, raspberries will add a more tart flavor. Adjust the sweetness of the cheesecake filling accordingly to balance the tartness of the new fruit. Ultimately, baking is all about having fun and creating something you love, so don’t be afraid to get creative with your fruity additions!
What’s the best way to prevent my Black Forest Cheesecake from cracking?
Cracks can be a cheesecake baker’s worst nightmare, but fear not! The key is gentle baking. Use a water bath by wrapping the springform pan in foil and placing it in a larger pan filled with hot water. This creates a humid environment, preventing the cheesecake from drying out too quickly. Also, avoid opening the oven door during baking, as temperature fluctuations can cause cracking. Once baked, let it cool gradually in the oven with the door ajar. Patience is key for a crack-free Black Forest Cheesecake!
How long does Black Forest Cheesecake last in the fridge?
If you manage to resist devouring the entire Black Forest Cheesecake in one sitting (a feat I personally find challenging!), it will keep well in the refrigerator for up to 5 days. Make sure to store it covered, either in an airtight container or wrapped tightly in plastic wrap, to prevent it from drying out or absorbing other odors from the fridge. After that, the texture and flavor might start to degrade slightly. But trust me, it’s unlikely to last that long!
Can I freeze Black Forest Cheesecake?
Yes, you can absolutely freeze your Black Forest Cheesecake! It’s a great way to enjoy a slice of decadent goodness whenever the craving strikes. To freeze, wrap the cheesecake tightly in plastic wrap, then in foil for extra protection against freezer burn. It can be stored in the freezer for up to 2 months. When you’re ready to indulge, thaw it in the refrigerator overnight for best results. You’ll have a delicious slice of Black Forest Cheesecake ready to enjoy!

Leave a Comment