

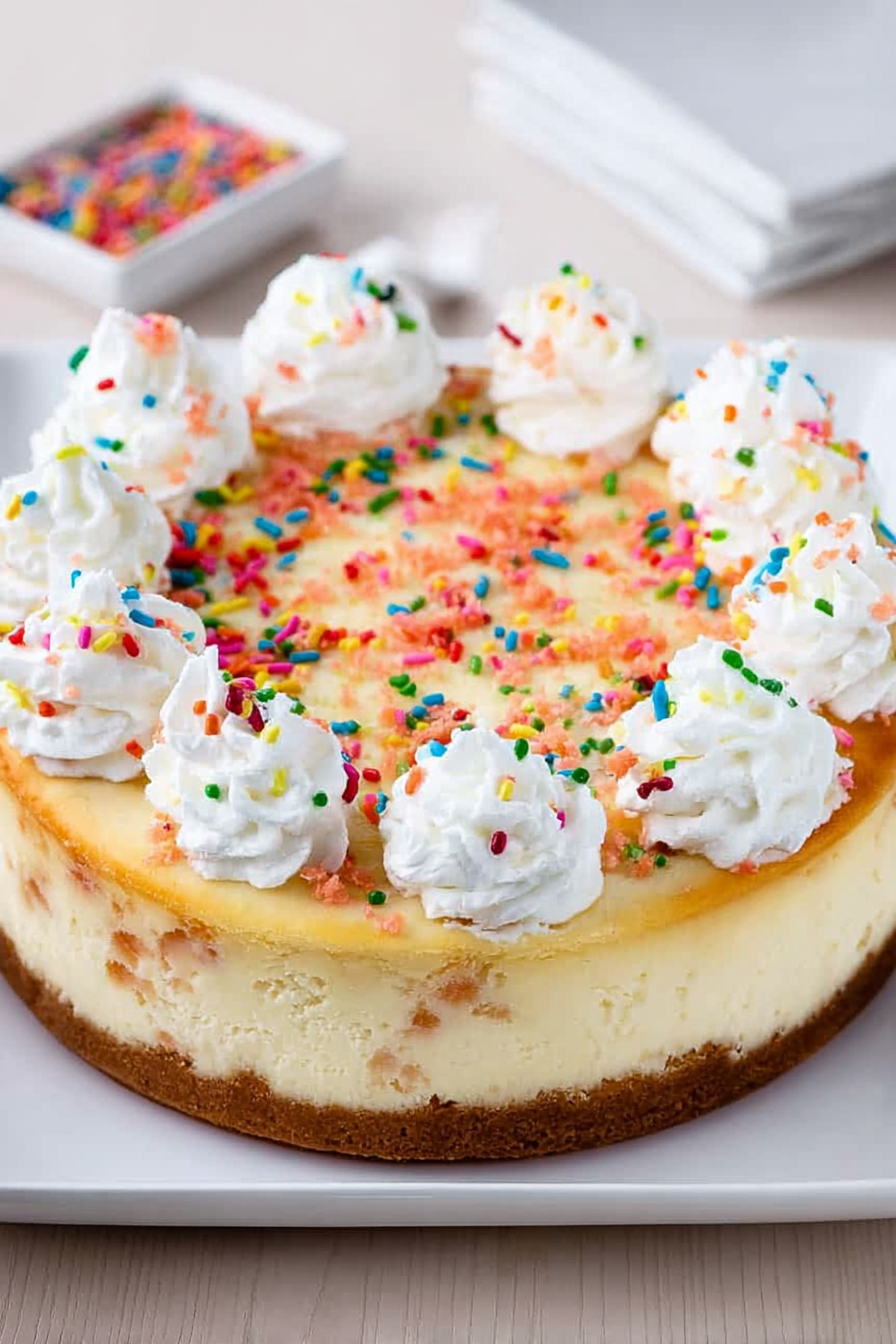
Ah, the Birthday Cheesecake. Just the name conjures up images of creamy, dreamy deliciousness, a symphony of sweet and tangy flavors swirling together in a perfect, celebratory bite. Imagine a velvety smooth cheesecake, its rich texture melting in your mouth, crowned with a playful explosion of colorful sprinkles, ready to make any birthday feel extra special.
This isn’t just a dessert; it’s a mood lifter, a smile inducer, a party on a plate! It’s the kind of treat that turns ordinary moments into cherished memories, a guaranteed hit at any gathering, and the perfect way to say, “Happy Birthday!” without singing off-key (unless, of course, you want to).
Here’s why this Birthday Cheesecake will steal the show:
- Effortlessly create a stunning centerpiece with minimal fuss, thanks to a straightforward recipe perfect for bakers of all skill levels.
- Experience the blissful harmony of creamy cheesecake filling and the delightful crunch of a perfectly baked crust, an irresistible textural contrast.
- Transform any birthday into a vibrant celebration with its playful sprinkle topping, adding a festive and visually stunning element to your dessert spread.
- Adapt the recipe to your heart’s content by experimenting with different extracts or fruit toppings, making it the ultimate customizable dessert for every birthday bash.
Ingredients for Birthday Cheesecake
Here’s what you’ll need to make this delicious dish:
The full ingredients list, including measurements, is provided in the recipe card directly below.
How to Make Birthday Cheesecake
Follow these simple steps to prepare this delicious dish:
Step 1: Prepare the Graham Cracker Crust
Preheat your oven to 350°F (175°C). In a medium bowl, combine the graham cracker crumbs and melted butter. Press the mixture firmly into the bottom of a 9-inch springform pan. Bake for 10 minutes, then let it cool slightly while you prepare the filling.
Step 2: Make the Cheesecake Filling
In a large bowl, beat the softened cream cheese and granulated sugar together until smooth and creamy. Ensure there are no lumps for the best texture. Add the eggs one at a time, mixing well after each addition. Stir in the Alcohol-free alcohol-free vanilla extract and sour cream until just combined. Do not overmix, or the cheesecake may crack.
Step 3: Bake the Cheesecake
Pour the cheesecake filling over the prepared graham cracker crust. Smooth the top with a spatula. Bake in the preheated oven for 55-65 minutes, or until the edges are set and the center is slightly jiggly. A slight wobble is what you want!
Step 4: Cool the Cheesecake
Turn off the oven and let the cheesecake cool inside with the door slightly ajar for one hour. This helps prevent cracking. Remove the cheesecake from the oven and let it cool completely on a wire rack.
Step 5: Chill and Decorate
Once cooled, cover the cheesecake with plastic wrap and refrigerate for at least 4 hours, or preferably overnight. This allows the flavors to meld and the cheesecake to set completely. Before serving, remove the cheesecake from the springform pan and decorate the top with colorful sprinkles.
Step 6: Serve and Enjoy
Slice the Birthday Cheesecake and serve chilled. Watch as the birthday person’s face lights up with joy! This cheesecake is the perfect centerpiece for any celebration, bringing smiles and sweet memories to all who partake.
Perfecting the Cooking Process
For the smoothest results, start with the crust. Prepare it while the oven preheats, then move onto the filling. This way, the crust has time to cool slightly before adding the creamy layer, preventing any potential sogginess. Finish with your favorite toppings after baking!
Add Your Touch
Want to jazz up your creation? Consider swirling in some raspberry puree for a fruity burst or mixing in chopped nuts to the crust for added crunch. A drizzle of chocolate sauce is never a bad idea. Let your imagination run wild!
Storing & Reheating
Keep your **Birthday Cheesecake** in the refrigerator, covered, for up to four days. It’s best enjoyed chilled. Freezing is not recommended, as it can alter the texture. Just take it out and enjoy!
Here are three tips to make your Birthday Cheesecake a guaranteed showstopper:
- Use room-temperature cream cheese for an ultra-smooth, lump-free filling. It makes all the difference!
- Avoid overbaking by using a water bath; it ensures even cooking and prevents cracking on top.
- Chill the cheesecake thoroughly, ideally overnight, for the best flavor and texture. Patience is key!
(Personal anecdote formated as paragraph subheading)
I remember the first time I made this for my friend’s birthday. Everyone raved about it, and now it’s a tradition! It’s truly the perfect way to celebrate.
The Unforeseen Adventure of Birthday Cheesecake
Birthdays, those annual celebrations of survival and questionable decisions, often demand cake. But not just any cake. Oh no, it needs to be *the* cake. The one that screams, “I’m another year older, but at least I get sugar!” For years, I was a cake-baking disaster. My attempts resembled something closer to abstract art, inedible abstract art. Then, I discovered the **Birthday Cheesecake**, a recipe that’s practically foolproof, even for someone as culinarily challenged as myself. Forget complicated layers and temperamental frosting; this dessert is creamy, dreamy, and surprisingly easy to pull off.
Why Choose Birthday Cheesecake?
Let’s be honest, most birthday cakes are just vehicles for frosting. But a **Birthday Cheesecake**? It’s a symphony of textures and flavors. The buttery, crumbly crust provides a satisfying foundation for the rich, tangy filling. Each bite is a little party in your mouth, a celebration of deliciousness. Plus, it’s a total crowd-pleaser. Even your picky Aunt Mildred, who claims to hate everything except prune juice, will secretly love it. The creaminess of the filling, when perfectly chilled, makes every spoonful worth every single calorie.
The Anatomy of a Perfect Birthday Cheesecake
Making a **Birthday Cheesecake** is less about following a strict recipe and more about embracing a delicious adventure. It’s about taking simple ingredients and transforming them into something extraordinary. The key is in the details, my friend. Using high-quality cream cheese is paramount. Don’t skimp on the good stuff! Trust me, your taste buds will thank you.
Crust Fundamentals
The crust is the unsung hero of this dessert. It provides structure, texture, and a delightful buttery flavor. You can use graham crackers, digestive biscuits, or even finely crushed vanilla wafers. Mix the crumbs with melted butter and a touch of sugar, then press firmly into the bottom of a springform pan. Pro-tip: Use the bottom of a measuring cup to get an even, compact crust. Blind bake it for about 10 minutes to give it a head start in becoming golden and delicious.
Filling Fantasies
The filling is where the magic truly happens. Cream cheese, sugar, eggs, and a touch of Alcohol-free alcohol-free vanilla extract are the building blocks of this creamy masterpiece. Ensure that your cream cheese is at room temperature to avoid any lumps. Nobody wants a lumpy cheesecake! Beat the ingredients together until smooth and creamy, then gently pour the mixture over the prepared crust. This part is strangely therapeutic, like giving the crust a warm, comforting blanket of deliciousness.
Navigating the Baking Battlefield
Baking a **Birthday Cheesecake** can seem daunting, but fear not! It’s all about patience and a little bit of oven wizardry. The key to preventing cracks is using a water bath. Wrap the bottom of your springform pan in foil to prevent water from seeping in, then place it in a larger roasting pan. Fill the roasting pan with hot water, reaching about halfway up the sides of the springform pan. This creates a humid environment that ensures even baking and a perfectly smooth surface.
The Water Bath Secret
The water bath isn’t just a fancy technique; it’s a game-changer. It keeps the cheesecake moist and prevents it from drying out and cracking. Think of it as a spa day for your dessert. The gentle heat and humidity create a luxurious environment that allows the cheesecake to bake evenly and develop its signature creamy texture. Plus, it’s oddly satisfying to peek into the oven and see your cheesecake happily soaking in its watery oasis.
Temperature Tango
Bake the cheesecake at a low temperature, around 325°F (160°C), for about an hour and fifteen minutes. The goal is to bake it until the edges are set but the center still has a slight jiggle. This ensures a perfectly creamy texture that melts in your mouth. Resist the urge to open the oven door too often, as this can cause temperature fluctuations and lead to cracks. Patience, young grasshopper!
Cooling Crisis Averted
Once the baking time is up, turn off the oven and let the cheesecake cool inside for about an hour with the door slightly ajar. This gradual cooling process helps prevent cracking and allows the cheesecake to set properly. Then, remove it from the water bath and let it cool completely on a wire rack before refrigerating it for at least four hours, or preferably overnight. Chilling is crucial for developing the best flavor and texture.
Topping Triumph
The topping is your chance to get creative and personalize your **Birthday Cheesecake**. Fresh berries, whipped cream, chocolate shavings, or a drizzle of caramel sauce are all excellent choices. You can even create a fruit mosaic on top for a stunning visual effect. The possibilities are endless!
Berry Bliss
A simple topping of fresh berries is always a winner. Strawberries, raspberries, blueberries, and blackberries create a beautiful and colorful presentation. Plus, the tartness of the berries complements the richness of the cheesecake perfectly. It’s a classic combination that never fails to impress.
Whipped Cream Wonders
A dollop of freshly whipped cream adds a touch of elegance and lightness to the cheesecake. You can flavor the whipped cream with Alcohol-free alcohol-free vanilla extract, a hint of citrus zest, or even a splash of your favorite fruit juice. For an extra touch of decadence, drizzle the whipped cream with chocolate sauce or sprinkle it with chopped nuts.
Cheesecake Troubleshooting: Common Pitfalls and How to Avoid Them
Even with the best recipe, things can sometimes go awry. But fear not, my friend! Here are some common cheesecake pitfalls and how to avoid them:
Cracks in the Cheesecake
Cracks are the bane of every cheesecake baker’s existence. They’re usually caused by rapid temperature changes or overbaking. To prevent cracks, use a water bath, bake at a low temperature, and allow the cheesecake to cool gradually in the oven. If a crack does appear, don’t panic! You can easily cover it up with toppings.
Soggy Crust
A soggy crust is usually caused by not baking it long enough or using too much butter. To prevent a soggy crust, blind bake it for about 10 minutes before adding the filling, and use the correct amount of butter in the recipe. You can also brush the crust with a thin layer of melted chocolate to create a waterproof barrier.
Lumpy Filling
A lumpy filling is usually caused by using cold cream cheese or not mixing the ingredients thoroughly enough. To prevent a lumpy filling, ensure that your cream cheese is at room temperature and beat the ingredients together until smooth and creamy. You can also use an immersion blender to smooth out any remaining lumps.
The Joy of Sharing
The best part about making a **Birthday Cheesecake** is sharing it with loved ones. It’s a delicious way to celebrate a special occasion and create lasting memories. So, gather your friends and family, slice up that cheesecake, and enjoy the sweet taste of happiness.
(Personal anecdote formated as paragraph subheading)
One year, I accidentally used salted butter in the crust. It turned out surprisingly delicious! Now, it’s my little secret ingredient.
Conclusion: The Birthday Cheesecake Legacy
The **Birthday Cheesecake** isn’t just a dessert; it’s an experience. It’s the culmination of simple ingredients, careful techniques, and a whole lot of love. Whether you’re a seasoned baker or a kitchen novice, this recipe is guaranteed to impress. So, go ahead, bake a **Birthday Cheesecake** and celebrate life, one delicious slice at a time. After all, birthdays only come once a year, so you might as well make them extra sweet.
Conclusion for Birthday Cheesecake :
This amazing Birthday Cheesecake is a guaranteed showstopper. Its creamy texture and customizable toppings make it the perfect centerpiece for any celebration. Don’t be intimidated by the process; it’s much easier than it looks! Remember to bake it low and slow, cool it gradually, and get creative with your decorations. This delightful dessert is sure to bring smiles and create lasting memories. So go ahead, bake up a batch and make someone’s birthday extra special!
Print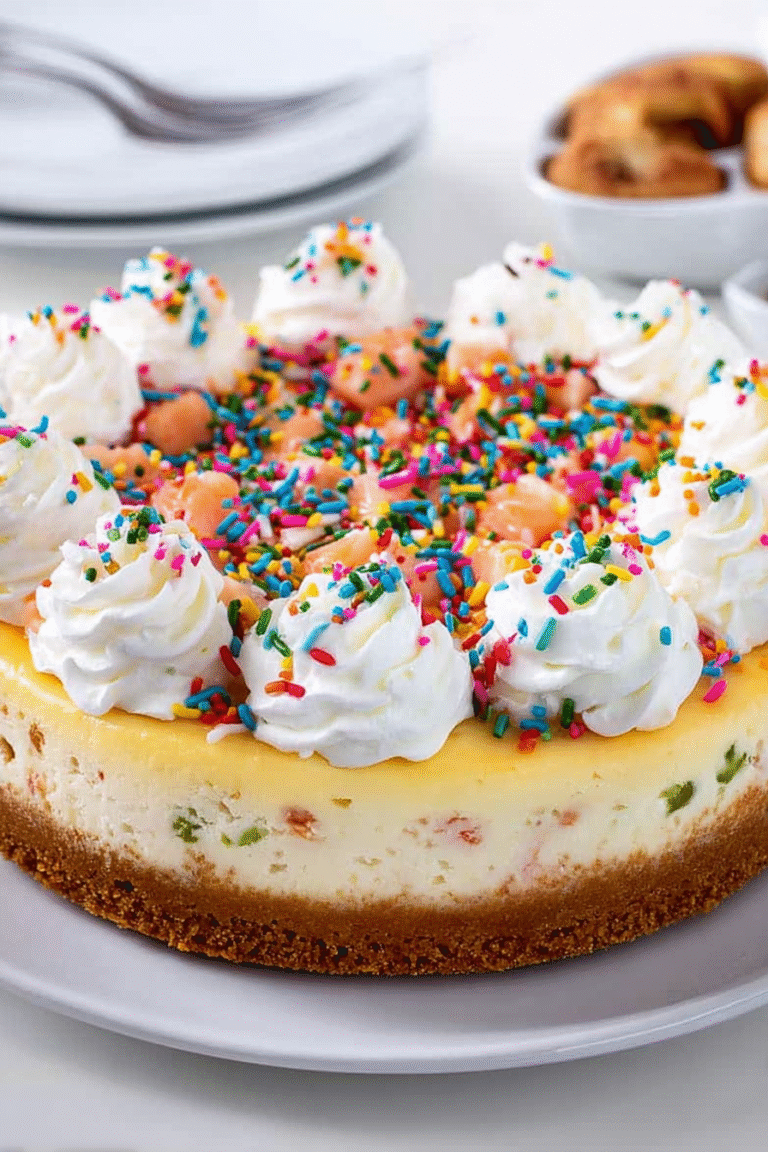
Birthday Cheesecake
Delicious birthday cheesecake recipe with detailed instructions and nutritional information.
- Total Time: 35 minutes
- Yield: 4 servings
Ingredients
- Graham crackers, crushed – 1 1/2 cups
- Unsalted butter, melted – 6 tablespoons
- Cream cheese, softened – 32 ounces (4 blocks)
- Granulated sugar – 1 1/2 cups
- Eggs – 4 large
- Vanilla extract – 2 teaspoons
- Sour cream – 1 cup
- Fresh berries (for topping) – 1 pint
Instructions
- Step 1: Preheat oven to 350°F (175°C). In a medium bowl, combine graham cracker crumbs and melted butter. Press mixture firmly into the bottom of a 9-inch springform pan to form the crust.
- Step 2: Bake the crust for 8-10 minutes, then let cool. Reduce oven temperature to 325°F (165°C).
- Step 3: In a large bowl, beat cream cheese and sugar until smooth and creamy. Add eggs one at a time, beating well after each addition. Stir in vanilla extract and sour cream until just combined. Do not overmix.
- Step 4: Pour the cream cheese mixture over the cooled crust.
- Step 5: Bake for 55-70 minutes, or until the edges are set but the center still has a slight wobble. Turn off the oven and let the cheesecake cool in the oven with the door slightly ajar for 1 hour.
- Step 6: Remove the cheesecake from the oven and let it cool completely on a wire rack. Cover and refrigerate for at least 4 hours, or preferably overnight. Before serving, top with fresh berries.
Notes
- For best flavor and texture, store the cheesecake covered in the refrigerator for up to 3 days.
- To gently warm a slice, try microwaving it for 10-15 seconds – just enough to soften it slightly, not melt it.
- Make the Birthday Cheesecake extra special by serving with a dollop of whipped cream and a sprinkle of edible glitter.
- Ensure your cream cheese is truly softened before mixing to avoid lumps and create the silkiest possible cheesecake.
- Prep Time: 15 minutes
- Cook Time: 20 minutes
- Method: Stovetop
- Cuisine: American
FAQs :
Can I prepare this Birthday Cheesecake ahead of time?
Absolutely! In fact, I highly recommend it. Making this decadent dessert a day or two in advance allows the flavors to meld together beautifully, creating an even more delightful experience. Just be sure to store it properly wrapped in the refrigerator to prevent it from drying out or absorbing any rogue refrigerator aromas (we’ve all been there with the leftover garlic!). When you’re ready to serve, simply add your favorite toppings and prepare for the accolades. It’s a fantastic way to reduce party-day stress and impress your guests.
What are some fun topping ideas for my special occasion Cheesecake?
Oh, the possibilities are endless! For a classic touch, go for fresh berries like strawberries, blueberries, and raspberries. A drizzle of chocolate sauce or homemade fruit compote adds another layer of flavor. If you’re feeling adventurous, try candied nuts, edible flowers, or even mini marshmallows. Get creative and personalize your cheesecake to match the birthday person’s favorite flavors. You could even set up a topping bar and let everyone customize their own slice. Remember, the key is to make it festive and fun!
How do I prevent my Birthday Cheesecake from cracking?
Ah, the dreaded cheesecake crack! Fear not, there are a few tricks to minimize this risk. First, don’t overbake it. Look for a slight jiggle in the center when you take it out of the oven. Secondly, let it cool gradually in the oven with the door slightly ajar. This prevents a sudden temperature change that can cause cracking. Finally, consider using a water bath while baking. The steam helps to keep the cheesecake moist and prevents it from drying out and cracking.
Can I freeze my celebration Cheesecake?
Yes, you can freeze this cheesecake! To do so, make sure the cheesecake is completely cooled. Then, wrap it tightly in several layers of plastic wrap, followed by a layer of foil. This will protect it from freezer burn. It can be stored in the freezer for up to 2-3 months. When you’re ready to enjoy it, thaw it in the refrigerator overnight. Keep in mind that the texture might be slightly different after freezing, but it will still be delicious!


Leave a Comment