

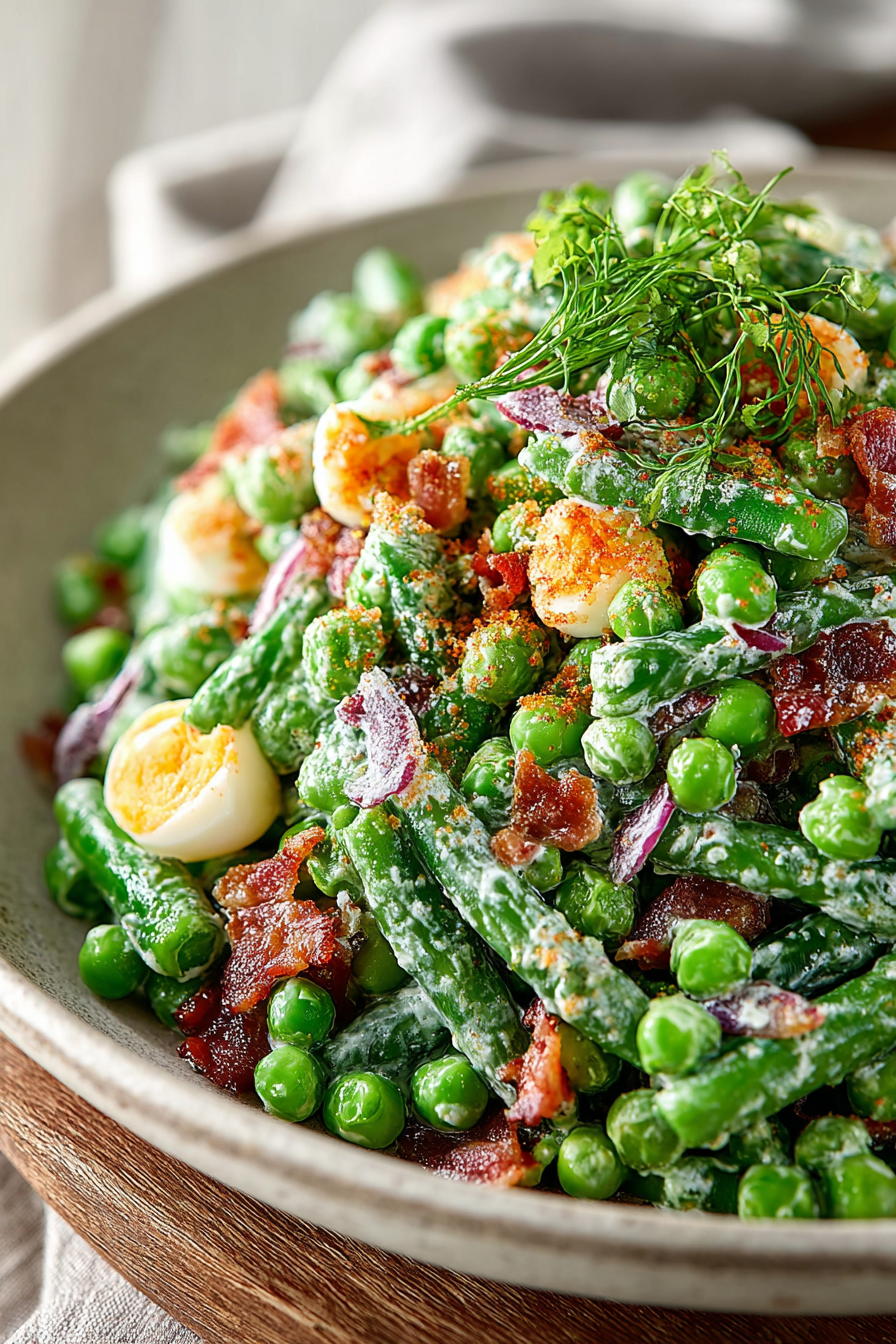
My quest for the perfect summer salad led me down a surprisingly hilarious path, culminating in this Easy Pea Salad Recipe. It’s a vibrant explosion of fresh flavors that’ll make you forget about those sad, wilted lettuce leaves of yesteryear. This salad isn’t just a dish; it’s a culinary adventure waiting to happen.
Picture this: a sun-drenched afternoon, the gentle breeze rustling through the leaves, and a bowl of this incredibly easy and delicious pea salad in front of you. It’s the ultimate summer side dish, a picnic essential, and the star of any barbecue. Get ready for a taste sensation that’s both refreshing and utterly satisfying.
This Easy Pea Salad Recipe boasts several amazing qualities.
It’s incredibly simple to prepare, needing minimal cooking skills.
The flavor is a delightful combination of sweet, savory, and refreshing.
Its bright green color and fresh ingredients make it visually stunning.
This recipe is easily adaptable to your favorite vegetables and herbs.
Ingredients for Easy Pea Salad Recipe
Here’s what you’ll need to make this delicious dish:
The full ingredients list, including measurements, is provided in the recipe card directly below.
How to Make Easy Pea Salad Recipe
Follow these simple steps to prepare this delicious dish:
Step 1: Prepare the Vegetables
Wash and chop all your vegetables. Dice the red onion, cucumber, and any optional additions. Finely chop the fresh mint. If using frozen peas, make sure they’re completely thawed.
Step 2: Combine Ingredients in a Bowl
In a large bowl, combine the peas, red onion, cucumber, and mint. Gently toss to combine.
Step 3: Make the Dressing
In a small bowl, whisk together the lemon juice, olive oil, salt, and pepper. Adjust seasoning to your taste preference.
Step 4: Dress the Salad
Pour the dressing over the vegetable mixture. Gently toss again to ensure all the ingredients are well coated. Avoid over-mixing, as this can bruise the vegetables.
Step 5: Chill and Serve
Cover the bowl and refrigerate for at least 30 minutes to allow the flavors to meld. This step is optional but highly recommended!
Step 6: Garnish and Enjoy
Before serving, give the salad another gentle toss. You can garnish with extra mint sprigs or a sprinkle of red pepper flakes for a little extra kick. Serve chilled and enjoy this incredibly refreshing salad!
Recipe Card for Easy Pea Salad
This section would normally contain a visually appealing recipe card with the full list of ingredients and precise measurements, along with a beautiful photo of the finished salad. However, as this is a text-based response, I can only provide you with the ingredient list, but remember to adjust quantities based on your desired serving size.
Ingredients:
1 cup frozen peas (thawed)
1/2 cup diced red onion
1 cup diced cucumber
1/4 cup chopped fresh mint
2 tablespoons lemon juice
4 tablespoons olive oil
Salt and pepper to taste
Tips and Variations for your Easy Pea Salad Recipe
This Easy Pea Salad Recipe is incredibly versatile. Feel free to experiment with different ingredients and flavors to create your own unique version.
Adding some crumbled feta cheese (for non-vegans) would add a salty tang.
Toasted sunflower seeds or pumpkin seeds add a delightful crunch.
A squeeze of lime juice instead of lemon can create a different flavor profile.
Try adding different herbs like dill or parsley for a change in flavor.
Remember to adjust the quantities of ingredients to your personal preference. The beauty of this recipe lies in its simplicity and adaptability. So, get creative and have fun with it!
Conclusion: Your Easy Pea Salad Recipe Awaits
I hope you found my little tale about this Easy Pea Salad Recipe engaging. It’s more than just a salad; it’s a celebration of simple ingredients and fresh flavors. It’s perfect for potlucks, picnics, and those days when you need a quick and healthy meal. So grab those peas, and let’s get cooking!
Perfecting the Cooking Process
First, prepare the chicken; then, while it rests, make the vibrant pea salad dressing. Toss the peas with the dressing, and gently incorporate the cooked chicken. Finally, chill for optimal flavor blending.
Add Your Touch
Feel free to swap chicken for beef or turkey. Experiment with different herbs like dill or chives. Toasted slivered almonds or sunflower seeds add a delightful crunch.
Storing & Reheating
Store leftovers in an airtight container in the refrigerator for up to three days. Reheat gently in a pan or microwave, avoiding overcooking. Enjoy!
Prepare the peas al dente to maintain their texture. Avoid overcooking the chicken; it should be juicy and flavorful. Use high-quality ingredients for the best taste.
My Aunt Millie, a culinary queen herself, once declared this Easy Pea Salad Recipe the best she’d ever tasted. Her words still echo in my kitchen!
Easy Pea Salad Recipe
This isn’t your grandma’s pea salad (unless your grandma was a culinary rockstar). This Easy Pea Salad Recipe is a vibrant, refreshing, and surprisingly easy-to-make dish that’s perfect for picnics, potlucks, or a light summer supper. Forget bland and boring; this recipe is bursting with flavor and texture. We’re talking juicy chicken, sweet peas, a tangy dressing, and maybe even a little crunch if you’re feeling adventurous. Let’s dive in!
Ingredients You’ll Need
:
This recipe is designed for ease and flexibility. Feel free to adjust quantities based on your needs and preferences. You’ll need:
1 pound boneless, skinless chicken breasts
1 pound fresh or frozen peas (thawed if frozen)
1/2 cup mayonnaise (vegan option available)
1/4 cup apple cider vinegar
2 tablespoons Dijon mustard
1 tablespoon lemon juice
1 tablespoon chopped fresh mint
1/2 teaspoon salt
1/4 teaspoon black pepper
Optional additions: red onion, celery, toasted nuts
Step-by-Step Instructions
:
This Easy Pea Salad Recipe is almost foolproof, but a few tips along the way never hurt.
First, we’ll tackle the chicken. Cook the chicken breasts until fully cooked through, whether you grill, bake, or pan-fry them. I prefer to pan-fry mine in a little olive oil until golden brown and cooked through. Let the chicken rest for about 10 minutes before chopping into bite-sized pieces. This step is crucial for juicy chicken. Don’t rush it!
Next, the star of the show: the peas. If using frozen peas, make sure they’re fully thawed. You can simply put them in a colander to drain and dry. No need to cook them further, unless you prefer them a bit softer.
Now for the magic touch: the dressing. In a medium bowl, whisk together the mayonnaise, apple cider vinegar, Dijon mustard, lemon juice, mint, salt, and pepper. Taste and adjust the seasonings as needed. If you’re feeling adventurous, add a pinch of sugar to balance the acidity.
Once the chicken is chopped, gently toss it with the peas and dressing until everything is well combined. Don’t overmix! We want the peas to retain their bright green color and the chicken to stay tender. If adding any optional ingredients such as chopped red onion, celery, or toasted nuts, toss them in now.
Finally, cover the bowl and refrigerate for at least 30 minutes, allowing the flavors to meld together. The longer it sits, the better it tastes. But honestly, it’s delicious even straight away if you’re ravenous.
Serving Suggestions
:
This Easy Pea Salad Recipe is incredibly versatile. Serve it chilled as a side dish alongside grilled chicken, fish, or burgers. You can also use it as a filling for sandwiches or wraps for a quick and satisfying lunch. It’s even delicious on crackers or crostini for a light appetizer.
Troubleshooting Tips for Easy Pea Salad Success
Sometimes, even the easiest recipes can have a few hiccups. Here are some common problems and solutions:
Overcooked Chicken: Chicken should be cooked through but still moist. Use a meat thermometer to ensure it reaches an internal temperature of 165°F (74°C).
Bland Dressing: Adjust seasonings to your taste. Add more vinegar for tang, mustard for sharpness, or lemon juice for brightness.
Mushy Peas: If using frozen peas, ensure they are thoroughly thawed before adding them to the salad to prevent water from diluting the dressing.
Recipe Variations
:
This Easy Pea Salad Recipe is a blank canvas for your culinary creativity.
Spice it Up: Add a pinch of red pepper flakes for a little kick.
Herby Delight: Experiment with different herbs like dill, parsley, or chives.
Creamy Texture: For an extra creamy salad, use a combination of mayonnaise and Greek yogurt (ensure its vegan if needed).
The Bottom Line on Your Easy Pea Salad Recipe
:
This Easy Pea Salad Recipe is a simple yet impressive dish that will impress your friends, family, or just yourself. The best part is that you can easily customize it to match your tastes and preferences. So grab your ingredients, and let’s get cooking! Enjoy!
Conclusion for Easy Pea Salad Recipe
This Easy Pea Salad Recipe is a delightful, simple, and refreshing dish. The combination of sweet peas, vibrant vegetables, and a tangy dressing makes it a crowd-pleaser. It’s quick to make, perfect for meal prepping, and adaptable to your taste preferences. So ditch the complicated recipes and give this easy pea salad a try – your taste buds (and your time) will be eternally grateful. Remember to enjoy this delightful recipe within a few days for the best flavor and texture.
Print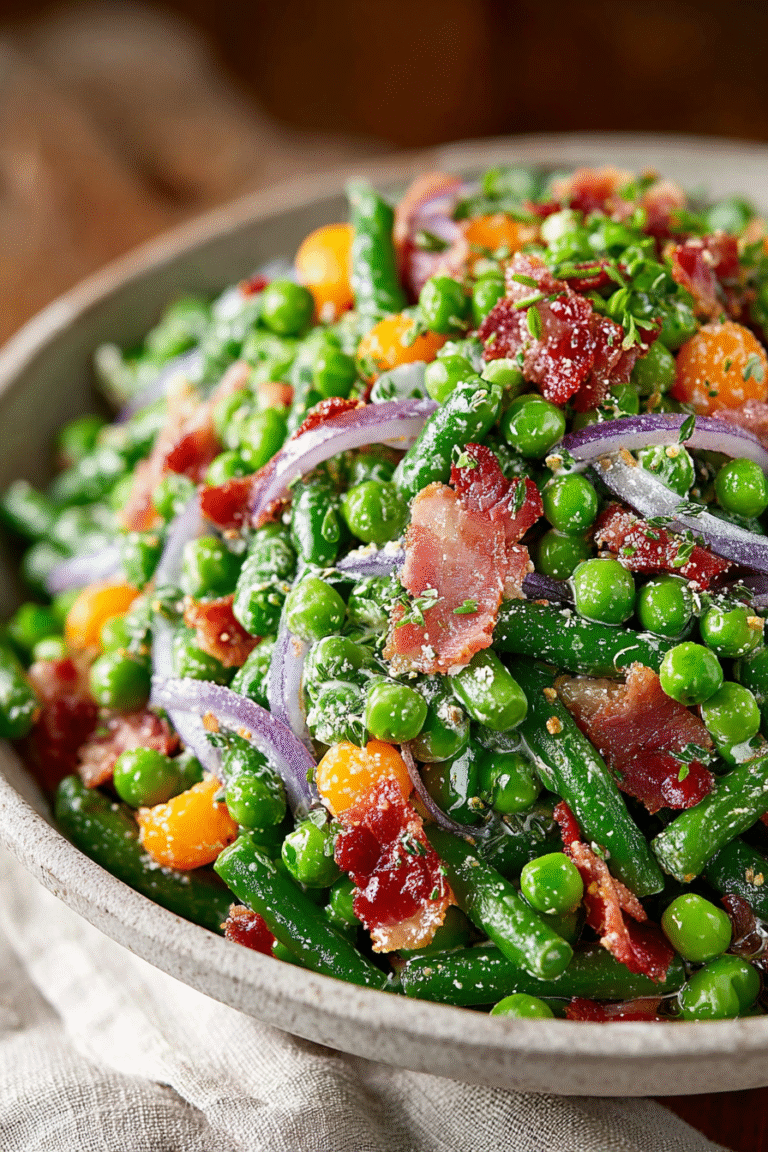
Easy Pea Salad Recipe
Delicious easy pea salad recipe recipe with detailed instructions and nutritional information.
- Total Time: 35 minutes
- Yield: 4 servings 1x
Ingredients
- 1 (16 ounce) package frozen peas, thawed
- 1/2 cup mayonnaise
- 1/4 cup red onion, finely chopped
- 1/4 cup chopped fresh mint
- 2 tablespoons lemon juice
- 1 tablespoon sugar
- 1/2 teaspoon salt
- 1/4 teaspoon black pepper
Instructions
- Step 1: In a medium bowl, combine the thawed peas, mayonnaise, red onion, and mint.
- Step 2: In a small bowl, whisk together the lemon juice, sugar, salt, and pepper.
- Step 3: Pour the lemon juice mixture over the pea mixture and stir gently to combine.
- Step 4: Taste and adjust seasonings as needed, adding more lemon juice for tartness, sugar for sweetness, or salt and pepper to taste.
- Step 5: Cover and refrigerate for at least 30 minutes to allow the flavors to meld. This is best served chilled.
- Step 6: Serve chilled. Enjoy!
Notes
- Store leftover pea salad in an airtight container in the refrigerator for up to 3 days.
- While reheating isn't ideal, a quick zap in the microwave for 15 seconds can soften it slightly if needed.
- This vibrant salad is a delightful side dish alongside grilled chicken or fish, or as a light lunch served on toasted bread.
- For an extra pop of flavor, add a finely diced jalapeño pepper along with the red onion for a hint of spice.
- Prep Time: 15 minutes
- Cook Time: 20 minutes
- Method: Stovetop
- Cuisine: American
FAQs
How long does this Easy Pea Salad Recipe last in the refrigerator?
This Easy Pea Salad Recipe, once made, is best enjoyed within 2-3 days for optimal freshness and flavor. After that, the peas might start to lose their vibrant color and delightful crunch. Storing it in an airtight container in the refrigerator will help extend its shelf life a bit, but don’t push your luck beyond day three! Trust me, your taste buds will thank you.
Can I use frozen peas in this Easy Pea Salad Recipe?
Absolutely! Frozen peas are a fantastic time-saver for this Easy Pea Salad Recipe. Just make sure you thaw them completely before adding them to the salad. You can thaw them in a colander under cold running water or in the refrigerator overnight. Avoid microwaving them, as it can make them mushy, and nobody wants a mushy pea salad, right?
What are some variations I can try with this Easy Pea Salad Recipe?
This Easy Pea Salad Recipe is incredibly versatile! Feel free to experiment with different additions. Think crunchy chopped celery, sweet red onion, a sprinkle of fresh herbs like dill or mint, or even some crumbled feta cheese (if you’re not vegetarian). You can also adjust the dressing to your liking – a bit more lemon juice for extra zing, or a dash of Dijon mustard for a bolder flavor. The possibilities are endless!
Is this Easy Pea Salad Recipe suitable for meal prepping?
Yes! This Easy Pea Salad Recipe is perfect for meal prepping. It’s best made ahead of time, allowing the flavors to meld beautifully. Prepare it the night before, or even a couple of days in advance, and store it in an airtight container in the refrigerator. This makes for a quick and delicious lunch or side dish throughout the week, making healthy eating a breeze!


Leave a Comment