
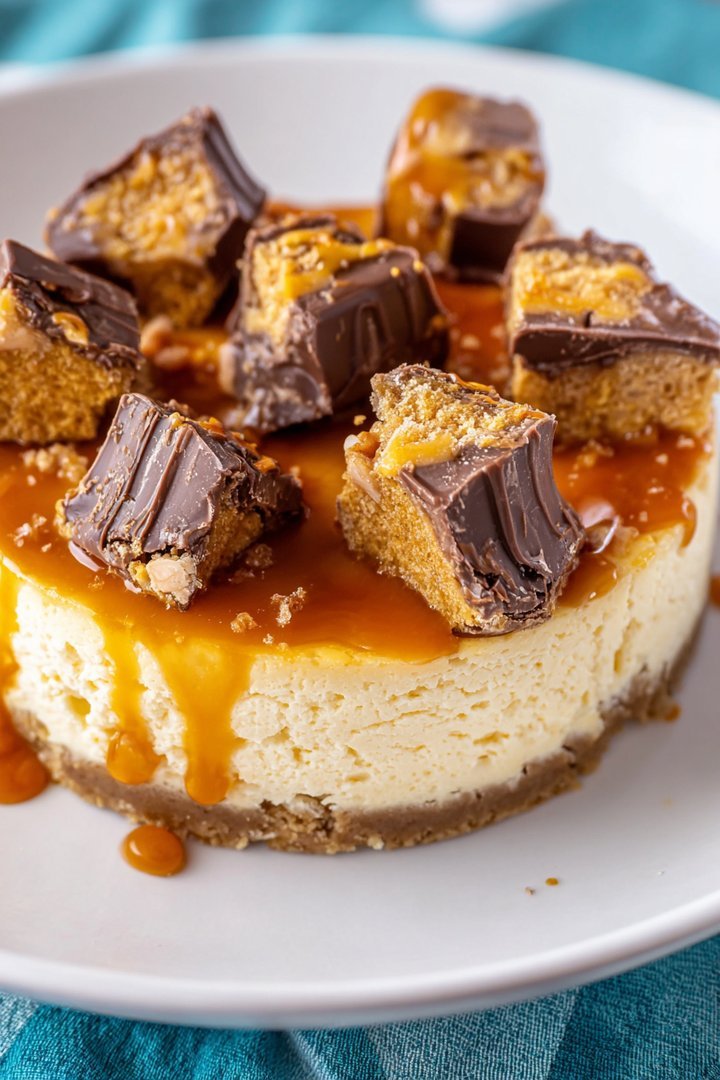
The symphony of textures and flavors in a Twix Cheesecake is a delightful dance on your palate, with crunchy biscuits and creamy, caramel-infused cheesecake goodness. Every bite of this heavenly dessert feels like a warm embrace, comforting and satisfying.
Imagine biting into a dessert that marries the iconic Twix candy bar with the creamy decadence of a classic cheesecake. It’s not just dessert; it’s a celebration of flavors that brings back childhood joy with every mouthful. I still remember the first time I tasted it, my eyes widened as I was amazed.
Here are a few reasons why this Twix Cheesecake will become your new favorite dessert:
- Effortlessly combines the fun of Twix candy bars with the sophistication of a creamy cheesecake, delivering a delightful dessert.
- Features a harmonious blend of crunchy biscuit base, smooth caramel filling, and a rich, creamy cheesecake layer.
- Visually stunning with its layered construction and caramel drizzle, this dessert is perfect for showcasing at gatherings.
- Easily adaptable to different occasions, from casual family dinners to elegant parties, making it a versatile treat.
Ingredients for Twix Cheesecake
Here’s what you’ll need to make this delicious dish:
- For the Crust Digestive biscuits create a sturdy and flavorful base; choose a brand that crumbles easily for best results.
- Melted Butter Unsalted butter binds the crust together; ensure it’s cooled slightly after melting to avoid a soggy base.
- For the Caramel Layer Granulated sugar caramelizes beautifully, offering a rich, sweet flavor; use medium heat for even cooking.
- Heavy Cream Adds a smooth, creamy texture to the caramel; ensure it’s at room temperature to prevent seizing.
- Alcohol-free alcohol-free vanilla extract Enhances the caramel’s flavor with its warm, sweet notes; use pure extract for the best taste.
- Salt Balances the sweetness of the caramel, creating a more complex and satisfying flavor profile.
- For the Cheesecake Filling Cream cheese is the star of the filling, providing its signature tangy flavor and creamy texture. Make sure it is completely softened.
- Granulated Sugar Sweetens the cheesecake filling, balancing the tanginess of the cream cheese.
- Eggs Bind the cheesecake filling together and add richness; use large eggs at room temperature for optimal blending.
- Alcohol-free alcohol-free vanilla extract Enhances the overall flavor of the cheesecake, adding a hint of warmth and sweetness.
- Sour Cream Adds moisture and a slight tang to the cheesecake, resulting in a smoother texture.
- For the Chocolate Ganache Semi-sweet chocolate chips provide a rich, chocolatey flavor that complements the caramel and cheesecake.
- Heavy Cream Creates a smooth, glossy ganache when melted with chocolate; ensure it’s heated gently to prevent scorching.
- For Garnish Twix candy bars add visual appeal and an extra layer of caramel and chocolate flavor.
The full ingredients list, including measurements, is provided in the recipe card directly below.
How to Make Twix Cheesecake
Follow these simple steps to prepare this delicious dish:
Step 1: Prepare the Digestive Biscuit Base
Crush the digestive biscuits into fine crumbs using a food processor or by placing them in a ziplock bag and crushing with a rolling pin. In a bowl, mix the biscuit crumbs with melted butter until well combined. Press the mixture firmly into the base of a 9-inch springform pan.
Step 2: Make the Caramel Layer
In a medium saucepan, melt the granulated sugar over medium heat, stirring constantly until it turns into a golden amber color. Carefully pour in the heavy cream (be cautious as it may bubble up) and stir until smooth. Remove from heat and stir in the Alcohol-free alcohol-free vanilla extract and salt. Pour the caramel over the biscuit base and let it cool and set in the refrigerator for at least 30 minutes.
Step 3: Prepare the Cheesecake Filling
Preheat your oven to 325°F (160°C). In a large bowl, beat the softened cream cheese and granulated sugar until smooth and creamy. Add the eggs one at a time, mixing well after each addition. Stir in the Alcohol-free alcohol-free vanilla extract and sour cream until just combined. Be careful not to overmix.
Step 4: Assemble and Bake the Cheesecake
Pour the cheesecake filling over the chilled caramel layer. Bake in the preheated oven for 55-65 minutes, or until the edges are set but the center still has a slight jiggle. Turn off the oven and let the cheesecake cool inside with the door slightly ajar for an hour. This helps prevent cracking.
Step 5: Make the Chocolate Ganache
While the cheesecake is cooling, prepare the chocolate ganache. In a heatproof bowl, place the semi-sweet chocolate chips. Heat the heavy cream in a saucepan until it just begins to simmer. Pour the hot cream over the chocolate chips and let it sit for a minute to soften the chocolate. Stir until smooth and glossy.
Step 6: Finish and Garnish
Once the cheesecake has cooled completely, spread the chocolate ganache evenly over the top. Refrigerate for at least 4 hours, or preferably overnight, to allow the cheesecake to fully set. Before serving, garnish with chopped Twix candy bars. Carefully remove the cheesecake from the springform pan, slice, and serve.
Perfecting the Cooking Process
To ensure the best results, start by preparing the crust and letting it chill. Next, make the caramel layer and allow it to set. Finally, whip up the cheesecake filling and assemble everything for a beautiful and delicious dessert.
Add Your Touch
Feel free to use different types of cookies for the crust, such as chocolate or graham crackers. You can also add chopped nuts to the caramel layer or swirl some chocolate sauce into the cheesecake filling for an extra layer of indulgence.
Storing & Reheating
Store your delightful Twix Cheesecake in the refrigerator for up to 3 days to maintain its creamy texture and prevent it from spoiling. It’s best enjoyed cold, straight from the fridge, so no reheating is necessary!
Here are some tips and tricks to ensure your Twix Cheesecake is a smashing success:
- For a perfectly smooth cheesecake filling, make sure your cream cheese is at room temperature before you start mixing. This prevents lumps and ensures a silky texture.
- Don’t overbake the cheesecake! A slight jiggle in the center indicates it’s done. It will continue to set as it cools in the refrigerator.
- Let the caramel layer cool completely before adding the cheesecake filling. This prevents the caramel from melting into the cheesecake, keeping everything separate.
(Personal anecdote formated as paragraph subheading (very important! don’t write any title for this paragraph))
I made this for my friend Sarah’s birthday, and she said it was the best cheesecake she’d ever had! The combination of textures and flavors was a total crowd-pleaser.
Unlocking the Magic of Twix Cheesecake
The allure of a great dessert is undeniable. A perfect blend of textures, flavors, and visual appeal can elevate a simple meal into a memorable occasion. And when you combine the comforting familiarity of a beloved candy bar with the creamy indulgence of a classic cheesecake, you’re in for something truly special. That’s where the *Twix Cheesecake* comes in. This isn’t just another recipe; it’s a culinary adventure, a chance to create something that will have your friends and family singing your praises. Forget the same old desserts; let’s dive into a world where creamy cheesecake meets crunchy cookies and luscious caramel.
Why Twix Cheesecake? Because You Deserve It!
Let’s be honest, sometimes you just need a little bit of decadence in your life. A treat that says, “You made it through another week, here’s a reward.” And what better way to reward yourself (or someone you love) than with a Twix Cheesecake? This isn’t just about satisfying a sweet tooth; it’s about experiencing a symphony of flavors and textures that dance on your palate.
Imagine this: a buttery cookie crust providing the perfect foundation, a layer of gooey, homemade caramel adding a touch of sweetness and chewiness, and a creamy, dreamy cheesecake filling that melts in your mouth. Then, to top it all off, crushed Twix candy bars scattered generously over the top, adding that iconic chocolate and caramel crunch. Are you drooling yet? Because I am!
Gathering Your Arsenal: Ingredients You’ll Need
Before we embark on this culinary quest, let’s make sure we have all our weapons…err, ingredients…in order. Don’t worry, this isn’t some complicated, chef-level recipe. It’s designed to be approachable and fun, even for those who aren’t exactly seasoned bakers.
- **For the Crust:**
- 2 cups chocolate wafer crumbs (about 30 cookies)
- 6 tablespoons unsalted butter, melted
- **For the Caramel Layer:**
- 1 cup granulated sugar
- 6 tablespoons unsalted butter
- 1/2 cup heavy cream
- 1/4 teaspoon salt
- **For the Cheesecake Filling:**
- 32 ounces cream cheese, softened
- 1 1/4 cups granulated sugar
- 1 teaspoon Alcohol-free alcohol-free vanilla extract
- 4 large eggs
- 1/2 cup sour cream
- **For the Topping:**
- 6 Twix candy bars, coarsely chopped
See? Nothing too scary. Just a bunch of delicious ingredients waiting to be transformed into something magical.
Crust Fundamentals: The Foundation of Flavor
The crust is the unsung hero of any cheesecake. It’s the base upon which all the other deliciousness rests. So, let’s treat it with the respect it deserves.
First, crush those chocolate wafer cookies into fine crumbs. You can use a food processor for this, or, if you’re feeling a little old-school, pop them in a zip-top bag and whack them with a rolling pin. It’s surprisingly therapeutic!
Next, combine the crumbs with the melted butter. Make sure the butter is evenly distributed so the crust holds together nicely. Press the mixture into the bottom of a 9-inch springform pan. You can use the bottom of a measuring cup to get it nice and even.
Bake the crust at 350°F (175°C) for about 10 minutes. This will help it set and prevent it from getting soggy later on. Let it cool completely before moving on to the next step. This is crucial; patience is key!
Caramel Creation: Liquid Gold
Now for the fun part: making the caramel! This is where things get a little bit science-y, but don’t worry, it’s totally manageable.
In a medium saucepan, combine the sugar and butter. Cook over medium heat, stirring constantly, until the sugar is melted and the mixture is bubbling. Continue to cook, without stirring, until the caramel turns a deep amber color. This usually takes about 5-7 minutes. Watch it carefully, as it can burn quickly!
Remove the saucepan from the heat and stir in the heavy cream and salt. Be careful, as the mixture will bubble up violently! Stir until smooth.
Pour the caramel over the cooled crust and spread it evenly. Let it cool completely before moving on to the cheesecake filling. You can even pop it in the fridge to speed things up.
Cheesecake Nirvana: Creamy Dreaminess
Alright, are you ready for the star of the show? The cheesecake filling is where the magic really happens.
In a large bowl, beat the softened cream cheese and sugar until smooth and creamy. This is where that room-temperature cream cheese really comes in handy. Lumps are the enemy!
Add the Alcohol-free alcohol-free vanilla extract and beat to combine. Then, add the eggs one at a time, beating well after each addition. Be careful not to overbeat the mixture, as this can incorporate too much air and cause the cheesecake to crack.
Finally, stir in the sour cream. This will add a touch of tanginess and help to keep the cheesecake moist.
Pour the cheesecake filling over the cooled caramel layer. Spread it evenly.
Baking Bliss: Patience is a Virtue
Now comes the hardest part: waiting! But trust me, it’s worth it.
Bake the cheesecake at 325°F (160°C) for 60-70 minutes, or until the edges are set and the center jiggles slightly. The jiggle is key! It means the cheesecake is done but still nice and creamy.
Turn off the oven and let the cheesecake cool in the oven with the door slightly ajar for 1 hour. This will help prevent cracking.
Remove the cheesecake from the oven and let it cool completely at room temperature. Then, cover it with plastic wrap and refrigerate for at least 4 hours, or preferably overnight. This is essential for the cheesecake to fully set.
The Grand Finale: Twix Topping Extravaganza
Finally, the moment we’ve all been waiting for!
Remove the cheesecake from the springform pan. Gently run a knife around the edge of the pan to loosen it if necessary.
Top the cheesecake with the coarsely chopped Twix candy bars. Arrange them artfully, or just pile them on there. It’s your cheesecake, do what makes you happy!
Slice, serve, and prepare to be amazed.
Troubleshooting Your Twix Temptation
Even the best bakers encounter hiccups sometimes. Here are a few common cheesecake conundrums and how to solve them:
- **Cracked Cheesecake:** This is usually caused by baking the cheesecake at too high a temperature or overbaking it. Following the instructions carefully and letting the cheesecake cool slowly in the oven can help prevent cracks.
- **Soggy Crust:** This can be caused by not baking the crust long enough or using too much butter. Make sure to bake the crust until it’s lightly golden brown and use the correct amount of butter.
- **Lumpy Filling:** This is usually caused by not softening the cream cheese enough. Make sure the cream cheese is at room temperature before you start mixing.
These tips should assist you in ensuring a successful Twix Cheesecake every time!
Twix Cheesecake: More Than Just a Dessert
This Twix Cheesecake is more than just a dessert; it’s an experience. It’s a conversation starter, a crowd-pleaser, and a guaranteed way to make someone’s day a little bit sweeter. So go ahead, give it a try! You might just surprise yourself with how easy and delicious it is.
Conclusion for Twix Cheesecake :
This Twix Cheesecake is a guaranteed crowd-pleaser, blending creamy cheesecake with the iconic flavors of caramel, chocolate, and that irresistible cookie crunch. Remember to chill it well for the best texture and consider making it ahead for ultimate flavor fusion. With its straightforward steps and unforgettable taste, this dessert is sure to become a go-to for special occasions or whenever you crave a little slice of heaven. So go ahead, bake up this irresistible treat and prepare to be amazed!
Print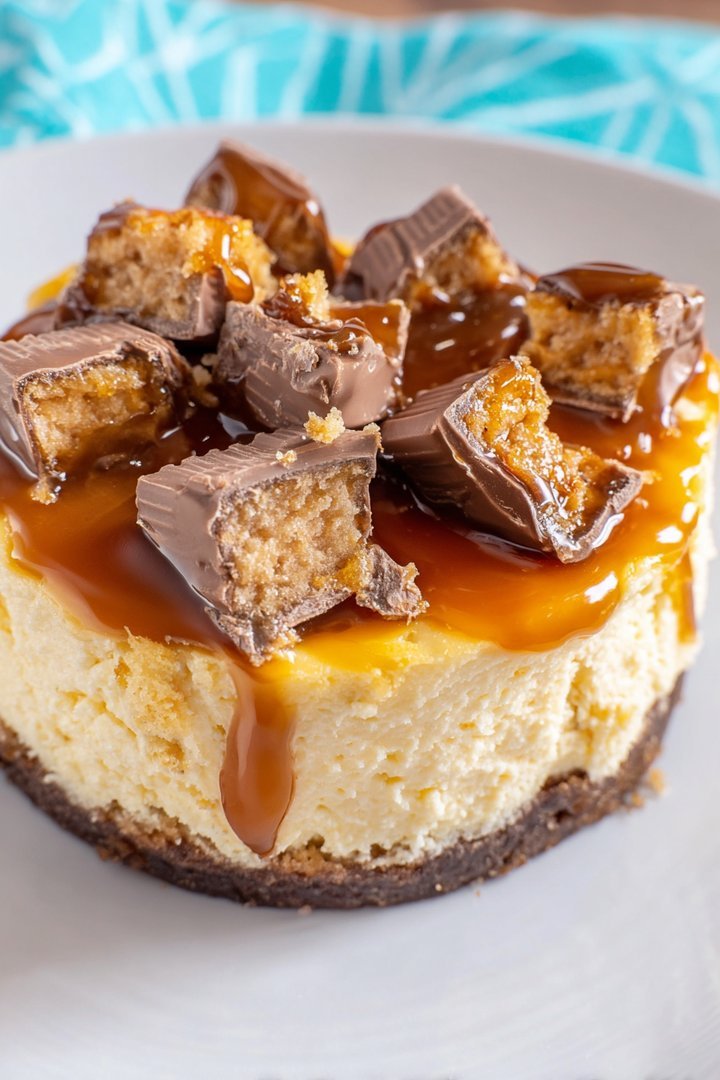
Twix Cheesecake
Delicious twix cheesecake recipe with detailed instructions and nutritional information.
- Total Time: 35 minutes
- Yield: 4 servings
Ingredients
- For the CrustDigestive biscuits create a sturdy and flavorful base; choose a brand that crumbles easily for best results.
- Melted ButterUnsalted butter binds the crust together; ensure it's cooled slightly after melting to avoid a soggy base.
- For the Caramel LayerGranulated sugar caramelizes beautifully, offering a rich, sweet flavor; use medium heat for even cooking.
- Heavy CreamAdds a smooth, creamy texture to the caramel; ensure it's at room temperature to prevent seizing.
- Vanilla ExtractEnhances the caramel's flavor with its warm, sweet notes; use pure extract for the best taste.
- SaltBalances the sweetness of the caramel, creating a more complex and satisfying flavor profile.
- For the Cheesecake FillingCream cheese is the star of the filling, providing its signature tangy flavor and creamy texture. Make sure it is completely softened.
- Granulated SugarSweetens the cheesecake filling, balancing the tanginess of the cream cheese.
- EggsBind the cheesecake filling together and add richness; use large eggs at room temperature for optimal blending.
- Vanilla ExtractEnhances the overall flavor of the cheesecake, adding a hint of warmth and sweetness.
- Sour CreamAdds moisture and a slight tang to the cheesecake, resulting in a smoother texture.
- For the Chocolate GanacheSemi-sweet chocolate chips provide a rich, chocolatey flavor that complements the caramel and cheesecake.
- Heavy CreamCreates a smooth, glossy ganache when melted with chocolate; ensure it's heated gently to prevent scorching.
- For GarnishTwix candy bars add visual appeal and an extra layer of caramel and chocolate flavor.
Instructions
- Step 1: Prepare the Digestive Biscuit Base
- Step 2: Make the Caramel Layer
- Step 3: Prepare the Cheesecake Filling
- Step 4: Assemble and Bake the Cheesecake
- Step 5: Make the Chocolate Ganache
- Step 6: Finish and Garnish
Notes
- Store leftover Twix cheesecake tightly covered in the refrigerator for up to 3 days.
- To easily slice the cheesecake, run a long, thin knife under hot water between each cut for clean, even slices.
- Serve chilled with a dollop of whipped cream and extra chopped Twix for an extra indulgent treat.
- Ensure your cream cheese is fully softened before mixing the filling to avoid lumps and achieve the smoothest texture.
- Prep Time: 15 minutes
- Cook Time: 20 minutes
- Method: Stovetop
- Cuisine: American
FAQs :
Can I make Twix Cheesecake ahead of time?
Absolutely! In fact, I encourage it! Twix Cheesecake is fantastic when made a day or two in advance. It allows the flavors to meld together beautifully, and the cheesecake has plenty of time to fully set. Just wrap it tightly and keep it refrigerated. Think of it as giving your cheesecake a little spa day in the fridge – it’ll come out even more relaxed and delicious! Who doesn’t love a make-ahead dessert that tastes even better with time?
What’s the best way to cut a clean slice of Twix Cheesecake?
Ah, the million-dollar question! The secret to slicing perfection is a hot, dry knife. Run a long, thin knife under hot water, wipe it completely dry, and then slice. Repeat this process between each slice for the neatest, most photogenic results. You can also use dental floss for a super clean cut – just pull it through the cheesecake like you’re flossing a giant, delicious tooth. Trust me; your presentation will be Instagram-worthy!
How do I store leftover Twix Cheesecake?
If, by some miracle, you have leftover Twix Cheesecake (I’m not judging if you don’t), store it in an airtight container in the refrigerator. It will happily keep for about 3-4 days. After that, the texture might start to change slightly. But let’s be real, does cheesecake *ever* last that long? It’s usually devoured well before its expiration date in my house. I consider any leftovers a personal challenge to overcome with a fork.
Can I freeze Twix Cheesecake?
Yes, you can definitely freeze Twix Cheesecake! Wrap it tightly in plastic wrap, then in foil, or place it in a freezer-safe container. It can be frozen for up to 2-3 months. When you’re ready to indulge, thaw it in the refrigerator overnight. Just be aware that the texture might change slightly after freezing, becoming a bit softer. But hey, softer cheesecake is still cheesecake, right? It’s like a cheesecake hug from the freezer!


Leave a Comment